Get an instant price

Do I Need an AC or a Heat Pump to Cool My House?

You’ve decided it’s time to update your home’s heating and air conditioning unit to a more energy-efficient system, and you’re excited about all the money you’ll be saving on your utility bills and shrinking your carbon footprint. But, as you start to do your due diligence research on HVAC systems, you discover there’s another energy-efficient cooling system besides the traditional central AC unit that many people are choosing to put in their homes instead: the heat pump. You begin to wonder, “Should I get a heat pump?” “What’s the difference between a heat pump and an air conditioner?” “Which HVAC system is the best one for me?” Luckily, you’ve come to right place. Below are answers to questions you’re probably asking yourself regarding the heat pump vs. air conditioner dilemmayou are currently facing.


I’m really not sure what I need…a heat pump or an air conditioner?

If you’re looking for a cooling system for your home, don’t let the name fool you – heat pumps are great for providing you with cold air during the warmer months. Heat pumps also operate just as efficiently, if not more so, than traditional air conditioners. The main difference between a heat pump and a standard air conditioner is that an air conditioner provides only cool air, while heat pumps provide both cool and warm air. There are air conditioning systems that provide heat also, but they do so by using electricity to create heat, which is not nearly as efficient as a heat pump which moves warm air around rather than generating it.


I want to ask for help but I don’t want to pay a trip and diagnostic fee.

Although it’s always a good idea to consult with a certified HVAC technician, we’ll try to help you out here a little. If you’re trying to determine whether a heat pump is a good choice for your home, the first place to start is to think about your area’s climate. Heat pumps work best in warmer climates with mild to moderate winters. If the temperature in your region frequently drops below freezing, it will be more difficult for a heat pump to draw heat out of the air, which may cause it to run non-stop or switch to an auxiliary heat source driving up its energy consumption and operational costs.

However, advancements in heat pump technology are making them suitable in areas that experience extreme cold weather, as much as 20 degrees below freezing. Newer heat pumps are gaining in popularity in colder climates because they are a good deal more efficient and cost much less to operate than oil-burning systems.

Once you’ve decided which system you’re going to get, it’s very important to have a technician visit your home to perform a load calculation. This will determine the size of the heat pump or air conditioner you need to properly cool and heat your home. Systems which are too small or too big will not be as efficient or will not effectively remove humidity from your home as a properly sized unit would.


Do I need an AC or a heat pump to cool my home?

If your home is already equipped with ducts, then central air conditioners and heat pumps are both good options for cooling your home. In fact, both systems share a number of common components, such as an outdoor unit that houses a compressor, condensing coil, fan, and motor, and an inside unit with an air handler, evaporator coil, and blower. Heat pumps are just as effective at providing chilled air as air conditioners, and they both pretty much work the same when it comes to cooling your home.

Central air conditioning units provide cooling by removing warm air from inside your home and using a refrigerant to the air when it enters the evaporator coil. This chilled air is then distributed throughout your home via a duct system and a blower located in the air handler unit. Heat pumps also remove warm air from your home in the same manner. However, the main difference between the two systems is that heat pumps have a reversing valve which, when switched on, reverses the direction of the refrigerant and transfers heat from the air outside to the inside of your home making it nice and toasty.

The heat pump’s ability to move air around and transfer heat from outside to inside and vice versa, makes it the perfect all-in-one-system that can provide both heating and cooling comfort. Plus, it’s extremely efficient since it’s merely moving hot air around as opposed to generating heat as a traditional HVAC system do.


Do I need an AC or a heat pump to heat my home?

As just mentioned, the great thing about a heat pump is that it both cools and heats. Air conditioners only cool the air unless the system is outfitted with electric heat strips. If you live in a climate where it is cold most months of the year, this type of system is going to use up a lot of energy to run since heat has to be created. This is where the heat pump has an advantage over traditional HVAC systems as it transfers heat from the outdoors to warm your home, which requires very little energy. Switching from an air conditioner with a heating element that generates heat to a more energy-efficient heat pump, which moves hot air around, can reduce your utility bill by up to 40% throughout the winter months.


Can I run the heat in the summer?

It is not recommended to have your heat pump in heat mode when it’s really warm outside as it could damage some of the internal components. If you want to test your heat pump system in the summer to make sure it will work during the winter, just switch it to heat mode for a minute or two to see if warm air comes out. If it does, then the reversing valve is working properly.


Can I have cooling in the winter if I need it?

If you need to have cool air in your home during the winter (perhaps because you set the thermostat to 90 degrees to shake off the chill when you woke up and left your house for the day forgetting to turn it down….. and you can’t open your windows to let the warm air out because they are all sealed shut for some reason) then you just have to switch the reversing valve from heating to cooling and you’ll be all set!


Are heat pumps a good choice in a four-season climate vs. a climate with less variance?

Heat pumps are a great choice for climates that stay mostly warm with little variance, such as Florida, or mostly cold, such as Maine, and everything else in between. They are just as efficient as top-of-the-line air conditioners for cooling your home during the summer and are the best choice efficiency-wise for heating your home in the winter. Heat pumps are an energy-efficient solution for most of your heating and cooling needs.


How do I know if I have a heat pump or an AC?

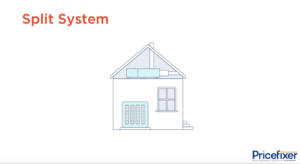
To find out if whether the system you currently have is an air conditioner or a heat pump, look for the yellow EnergyGuide label located on the outdoor or indoor air unit. Located just below the “ENE” of the “EnergyGuide” title will be a description of your type of system. For example, you might see the words: “Central Air Conditioner – Cooling Only – Split System”  or “Heat Pump – Cooling and Heating – Split System.”

If you are unable to see the label on your system, then another way to tell if you have a heat pump or air conditioner is to walk outside to the big metal box unit located next to your house, and take a peek between the slats. If you see a copper-looking device shaped like this….

copper device heat pump

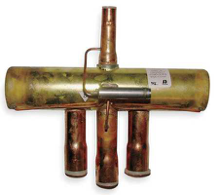
…then you have a heat pump.


Wait, what about a furnace? What’s the difference?

Furnaces, which are more popular in northern states, generate heat by burning oil or natural gas and blowing the heated air into your home. Heat pumps transfer heat from the air outside into your home to provide warmth. Even if the outside air seems cold to you, a heat pump can still pull the heat from cold air. However, how much heat is transferred into your home depends on the outside temperature. As it gets colder, there is less heat available to extract.

Typically, when temperatures reach around 25-30 degrees, a heat pump will run longer and may even trigger a supplemental heating source, such as a furnace or electric heat strips, to aid in warming the air. When this happens, the heat pump becomes less efficient and consumes more energy to run. If you live in a climate where the temperature frequently drops below 30 degrees, a heat pump may not be the best option for you. Furnaces, on the other hand, can provide heat even in the coldest of cold climates.


Any shocking information about heat pumps?

Probably the most “shocking” thing about heat pumps is the different types of heat pumps that are available! We’ve mostly been talking about “Air Source” heat pumps, which are the most popular, but there are also “Geothermal” heat pumps, and “Absorption” heat pumps. Here’s how they differ:

  • Air source heat pump– extracts and moves heat between the air outdoors and the air indoors.
  • Geothermal heat pump– transfers heat to and from the ground or a nearby water source to your home.
  • Absorption heat pump– is similar to an air-source heat pump but uses heat sources, such as solar-energy, natural gas, propane, or geo-thermal water, instead of electricity to operate.


What’s the Department of Energy say about heat pumps?

Recognizing the energy-savings advantages heat pumps have over other HVAC systems, the Department of Energy (DOE) states that heat pumps can provide equivalent heating and cooling for as little as one quarter the cost of other systems. When used for heating, the heat pump can reduce the amount of electricity used by approximately 50% compared to furnaces and baseboard heaters. The DOE also notes that high-efficiency heat pumps are better at dehumidifying than standard central air conditioners, which result in less energy being used and more cooling comfort during the warmer months.


You can always call us or visit our website for a walk through on AC vs. heat pumps.

If you have additional questions, or still aren’t sure whether an air conditioner or heat pump is the right system for you, then just visit Pricefixer.com or call us at (877) 774-2334 and we’ll be happy to answer all your questions!

Programmable Thermostats – Everything You Need to Know

Definition of programmable thermostat

A programmable thermostat adjusts the temperature of your home based on preset temperatures and times you’ve programmed into it. No more forgetting to turn up the AC before you leave the house for work; a programmable thermostat does the work for you by automatically keeping your home warmer during the day when you’re out and cooler in the evening when you’re sleeping.


Brief history of the thermostat

One of the first thermostats was created in the 1830s by Andrew Ure, an inventor who constructed a device with two metal strips that would expand and bend when the temperature increased. When the metal strips would bend, they would cut off the energy supply of the system thereby helping to regulate the temperature. Not too long afterwards, Warren S. Johnson invented the first electric thermostat that also had bi-metallic and a mercury switch which transferred the currents turning on the system. He ended up patenting his design and creating the Johnson Electric Service Company in 1885 to manufacture his product.

Around the same time, Albert Butz utilized a spring motor and pulley system to create the “damper flapper,” which would automatically open and close the flapper of coal furnaces to regulate the temperature. This invention is the origin of modern automated temperature control systems. Butz patented his design also and formed a company which was eventually purchased by a young engineer named Mark Honeywell, who went on to develop the first programmable thermostat. His programmable thermostat included a clock so one could preset the temperature for the following morning. In the 1950s, dial thermostats were introduced by Honeywell’s company and are still in existence today. In the 1980s, thermostats with digital displays and programmable functions entered the marketplace allowing for more control and energy savings for the consumer.


Understanding your programmable thermostat

One of the most useful features of a programmable thermostat is the ability to program the temperature based on the schedule and routine of your day. So, if you like to wake up to a slightly warmer temperature in the morning during the winter, then you can program your thermostat to achieve a higher temperature starting one to two hours before you awake. You can also program it to get progressively cooler in the evening to help lull you into a sound sleep.

The ability to program your thermostat helps you save money by allowing you to regulate the temperature during different times of the day and according to your schedule. Therefore, one of the first things you should do after you’ve installed your programmable thermostat is to track your daily weekday and weekend schedule. Once you’ve done that, you’ll know how best to program your thermostat for money-saving efficiency and automated comfort for you in your home.

Programmable thermostats are quite advanced and come equipped with microprocessors that allow you to store multiple daily and weekly temperature settings. There are a variety of programmable thermostats available with different advanced features and functions, but at the very least they will have the following basic four settings:

  • Wake: If waking up to a slightly warmer environment is what you desire, then this is the setting where you’ll put in your “get-out-of-bed” temperature. You’ll want to set the wake time 30 to 60 minutes prior to your actual wake time to allow the system time to warm up your home.
  • Leave: If your home will be empty for most of the day after you leave in the morning, then here is where you’ll set the temperature of your home to be slightly warmer on those summer days to save energy. You can set the “leave” temperature 30 minutes prior to when you actually leave for even more energy savings.
  • Return: This is where you’ll want to set the temperature to start warming or cooling your home around the time the first person in your family arrives home.
  • Sleep: This setting allows you to program your thermostat later in the evening, say 10:30 p.m., to a cooler temperature when most of your family has turned in for the night.

Programmable thermostats also have the option for manual override settings that won’t delete of interfere with your pre-programmed settings.


Is there mercury in a programmable thermostat?

Most electronic programmable thermostats sold today are mercury-free. If there is mercury in your thermostat, the sign for mercury, “Hg,” will be clearly labeled on the packaging.


Setting up the programmable thermostat

Before setting up your programmable thermostat, make sure you’ve put in new batteries. The next step is to follow the instructions in the manufacturer’s guide that came with your thermostat. When setting temperature and times, allow enough time for your HVAC system to achieve your desired temperature before you actually arrive home, go to bed, wake up, etc. If you’d like to have the option of programming different temperature settings for Saturday and Sunday, be sure to shop around for a thermostat that has that feature, otherwise those two “weekend” days will be treated as one with the same settings.


How frequently should my heating and cooling cycle on/off?

An air conditioner’s run time is known as a “cycle” and most systems have 2-3 cycles per hour. A typical cycle during mild weather is about 10-15 minutes. In extreme weather conditions, you can expect the cycles the run a bit longer. If your system is constantly cycling on and off, more than 2-3 times an hour, then your system is “short cycling,” which could indicate a problem with your unit.

If you’re wondering how long it should take for your AC system to cool your home, just know there are several factors which could influence the length of your unit’s run-time. For example, the outdoor temperature, the size of your home, the size of your AC system, and how warm you let the inside of your home get before it starts cooling down can all factor into how long it takes to cool your home. If you think your system is running longer than it should, call a professional, as an HVAC system which is running more than it should will have a significant impact on your utility bill.


What are the symptoms of a failing t-stat?

There are several signs to be aware of that could indicate a problem with your programmable thermostat:

  • Thermostat is unresponsive
  • Heater or AC won’t turn on
  • HVAC system won’t turn off
  • Room temperature doesn’t match setting on thermostat.


How do you calibrate a programmable thermostat?

If you suspect your thermostat is not reaching the temperature you’ve programmed it to, then you should perform a calibration to see if there really is a problem. To calibrate your programmable thermostat, do the following steps:

  1. Place an accurate thermometer right next to the thermostat. You can affix it to the wall with tape. Wait 10 to 15 minutes for thermometer to adjust.
  2. Check the temperature reading on the thermometer with the temperature reading on the thermostat. If it there is a difference, then you’ll need to calibrate the thermostat.
  3. Consult the manufacturer’s manual or scroll through the menu options on your thermostat to change the temperature offset.
  4. Adjust the temperature of your thermostat to match the reading on the thermometer. Your programmable thermostat will now use this new number as the actual temperature going forward.


Diagnosing problems – why is the programmable thermostat not working?

Troubleshooting.

If your programmable thermostat isn’t working properly, there are a few options you can try first before calling a professional.

  1. Check the batteries: Remove the front cover of your programmable thermostat and check or replace the batteries if necessary.
  2. Check the settings on your thermostat: Make sure you have the thermostat properly set to “heat” in the winter and “cool” in the summer.
  3. Remove dirt and dust: Make sure the exterior and interior of the thermostat are free of any dirt or dust. Gently wipe away any dirt or dust which could interfere with components on the inside.
  4. Check the circuit panel: Make sure the circuit panel doesn’t have a tripped breaker.
  5. Wire contacts: Remove the thermostat from its mounting on the wall and check the wire contacts to see if one has come loose.
  6. Check both heating and cooling: If your heat is working properly but you’re not getting any cold air, or vice versa, then the problem could be with the equipment and not the thermostat.

If none of these troubleshooting tips provide a solution, it may be time to replace your programmable thermostat. Check your warranty or if there have been any recalls for your product to see if you can get a free replacement.


Clear list of steps to operate the programmable t-stat

To set your programmable thermostat, follow these steps:

  1. To set the air conditioner for the weekdays, switch the thermostat to “cool” and select a program.
  2. Select “Weekdays” and then select the times and temperatures you would like for Monday through Friday. For example, if you want to raise the morning temperature to 76 degrees before you wake up 7:00 a.m., then set the time to 6:30 a.m., and the temperature to 76.
  3. If you leave your home at 8:30 a.m. on Monday, you can choose to set your thermostat to a warmer 78 degrees at 8:00 a.m.
  4. Upon returning home at 6:00 p.m., set the thermostat to 74 degrees starting at 5:30 p.m. to ensure your home is sufficiently cooled before you get home.
  5. For cooler temperatures when you sleep, choose the time you typically go to bed and the temperature you prefer. This program will now repeat itself for the other days of the week.
  6. To set the temperature for Saturday and Sunday, choose “weekend” and select the times and temperatures. Most programmable thermostats allow four settings per day for weekdays and two for the weekend. There are also thermostats available that allow individual settings for each day of the week as well. 


How does a thermostat know the temperature?

Electric programmable thermostats use a “thermistor” to measure the temperature. A thermistor is an electrical resistor that changes its resistance with temperature changes. A microcontroller within the thermostat measures the resistance of the thermistor and displays that number to a digital temperature reading.


The cost of a programmable thermostat plus how much can I save a year with one?

Programmable thermostats are quite affordable with most models starting at around $40. With the ability to adjust the temperature based on predetermined times, which allow for optimum energy savings, you could save hundreds of dollars a year with this type of thermostat. Not only do they provide customized comfort based on your lifestyle, but they can also maximize your energy savings, nearly up 33% more than a manual thermostat would.


Should I upgrade to a programmable t-stat from my basic?

If you spend most of your time at home and don’t mind constantly getting up to adjust the temperature, then a manual thermostat should be fine. However, if you leave your house for long periods of time, want to save on energy and utility costs, and want the convenience of “setting it and forgetting it,” then a programmable thermostat is the choice for you. You may also want a “smart” thermostat. Click here to learn more about all of your options.


Choosing the Right Thermostat for Your Home

A lot has change for the once plain and lowly thermostat throughout the past twenty years. What started out as a relatively simple device used to control and maintain the temperature, has burgeoned into a hip, technologically-sophisticated smart home device that can do so much more than just keep your home at a comfortable temperature.

Originating as early as the mid-19th century, the thermostat was invented when the need arose to regulate the temperature and humidity in mills and production facilities to protect the products being manufactured. Today, thermostats are used around the world to keep homes, work places, and public buildings at comfortable temperatures and to protect us from the extreme heat and cold of Mother Nature.

There are three main types of thermostats available today: the basic (or manual) thermostat, the programmable thermostat, and the connected / smart thermostat.


Basic / Manual Thermostats

The basic thermostat is still widely used in many homes today. Originally designed with a rotating dial, and then as a rectangular box with a lever that move to the right or left to select the temperature setting, if you want to adjust the temperature you have to walk up to the thermostat and manually move the dial (or lever) to your desired setting. Comprised of bi-metallic strips that coil and uncoil at specific temperatures, the basic thermostat does a decent job of maintaining a comfortable level of heat or cool air in your home. However, the dials and levers on basic thermostats are not very precise and could be off by several degrees of the temperature you think you’re setting. This could lead to a loss in energy savings and an increased utility bill.

To know just how much the temperature plays a part in energy savings, a good rule of thumb to go by is that for every degree you raise or lower the temperature on your thermostat, results in a 1% increase or decrease in your energy bill. For example, if you like to keep your home a cool 65 degrees in the summer, then by moving the temperature up to 75 degrees, you’re saving 10% on your energy bill. Since basic thermostats aren’t very accurate, you may think you’ve set your thermostat to 75 degrees, when actually it’s cooling your home to 73 or 74 degrees, so you’re using more energy than you want to and paying more than you expected.

There are basic thermostats with digital displays, however, that are more precise. If you want the temperature to be 75 degrees, then just punch that number into the display. Basic thermostats that are digitized also allow you the option to punch an “up-” or “down-” arrow button to easily increase or decrease the temperature. Basic thermostats can save you money when you leave your house empty for long periods of time, but that’s only if you remember to manually adjust the temperature on the thermostat yourself before you leave. Basic thermostats are the least expensive type of thermostat you can buy due to their limited features. The non-digital basic thermostat typically costs between $15 and $35, but they are being phased out because they contain mercury. Basic thermostats with a digital display cost around $20 – $50. Though still limited, the digital display allows you to set a specific temperature. Basic thermostats are best for those people who are home a lot and like its simplicity and ease of use.


Programmable Thermostats

Up until just a few years ago, programmable thermostats were the most technologically advanced and energy-saving thermostats available on the market. A programmable thermostat offers the convenience and energy-saving function of setting different temperatures for different times of days. So, for example, if your work-day routine typically has you arriving home at 6 p.m., then you can program the thermostat to start cooling, or warming, your home at 5:30 p.m. so it’s at the perfect temperature by the time you walk in the door. You can also program it to adjust the temperature higher or lower while you’re sleeping to save energy as well.

Most programmable thermostats allow you to program up to four different set times for the week (5 days) and up to four different times for the weekend (2 days). There’s also a manual override switch where you can manually adjust the temperature either higher or lower without affecting any of your pre-programmed schedules. Programmable thermostats are a great way to save on energy costs by giving you the ability to set energy-efficient temperatures for those times of the day when you’re either away from home or sleeping. No more leaving the house without forgetting to adjust the temperature and wasting money– just set it and forget it.

The four main settings programmable thermostats have are: Wake, Leave, Return, and Sleep. Before setting the times and temperature for each of these categories, it’s important to know your schedule. Spend a few days tracking the time you typically leave your home, the time you return, when you typically go to sleep, and when you wake. Now, you’ll have a better idea for when to program the thermostat to begin warming or cooling your home. Since it can take up to 30 minutes for the temperature to regulate once the system kicks in, it’s best to program the time for 30 before you want to wake up, go to sleep, leave, or arrive home.

Newer programmable thermostat models have even more programming options and allow you to have numerous temperature settings throughout the day and the ability to program each day individually, instead of being limited to just 5 days at a time and 2 days at a time. With advanced features such as touch screens and illumination for easy access at night, programmable thermostats give you more flexibility and control of your heating and cooling while significantly cutting your energy costs.

Programmable thermostats range in price from $25 to $150 and are a great mid-priced option for helping you save money each month on your utility bill – up to 33% more over manual thermostats!


Connected & Smart Thermostats

Taking the convenience and flexibility of programmable thermostats one step further, “smart” thermostats allow you to adjust your home’s temperature remotely from your computer, tablet, or smartphone. Performing the same functions as programmable thermostats, smart thermostats give you the flexibility to regulate the temperature in your home around the clock. So, for those days when you unexpectedly work late or go out to dinner with friends after work instead of going home as you normally would do, smart thermostats allow you to re-adjust the temperature setting remotely, so you can still save money on those days you veer from your routine.

Thermostats that connect to the internet and allow you to make changes remotely are known as “connected” thermostats. All smart thermostats are connected to the internet, but not all “connected” thermostats are considered “smart.”  Thermostats that are considered truly “smart,” are those that can learn from your behavior and automatically set your temperature schedule for you. Rather than programming it yourself, a smart, or “learning,” thermostat will monitor the temperatures you typically input during certain times of the day, and after a short period time will begin to automatically adjust the temperature on its own. Trying to figure out how to program your thermostat and set multiple temperature schedules has been eliminated – the smart thermostat automatically does it for you!

Other advanced features smart thermostats have are:

  • Real-time your energy consumption statistics
  • Filter and maintenance alerts
  • Energy-efficient recommendations
  • Air quality monitoring
  • Zoning
  • Weather forecasting
  • Touch screens
  • Changeable colors to match your interior

Smart thermostats are changing how homeowners manage their energy consumption and other smart features of their home. The Nest thermostat is a popular smart thermostat that works with over 115 other smart devices, such as garage door openers, lights, media centers, alarms, Alexa and Google Assistant. The Nest also supports Bluetooth and has geofencing technology, which uses your smart phone to track your proximity to your house so it can adjust the temperature accordingly and getting it to your desired setting by the time you arrive home.

Some smart thermostats, such as the Ecobee4, use remote sensors to measure the temperature in multiple rooms, thereby saving energy costs by not heating or cooling a room that doesn’t need it. The Ecobee4 also uses occupancy detectors to determine if a room is occupied resulting in extra energy savings from not needlessly heating or cooling a room that’s empty. With a built-in Alexa voice command system, the Ecobee4 can also give you the latest headlines, play music, and perform all the same functions as the Amazon Echo, without needing to buy one.

With costs ranging from $200 to $300, smart thermostats are definitely costlier than basic and programmable thermostats, but the energy savings, convenience, and numerous features they offer make them a very appealing choice. Plus, an upside is that based on multiple studies, people liked the ability to change the temperature of their home remotely so much that they did it a great deal more than if they had to adjust their thermostat manually, resulting in more than half the participants in the study using less energy. Another study reported that smart thermostat users saved on average 10-12% on heating and 15% on cooling costs, which equaled nearly $130 in annual savings.

Basic thermostats and programmable thermostats can also provide energy savings, if they are programmed properly and you are diligent about keeping to a set schedule and you remember to adjust it every time you leave the house or go to bed. It’s hard to maintain but is doable. Smart thermostats, however, make is so easy to change the temperature for energy efficient savings, that you hardly even have to think about it.


What should I set my thermostat to?

After reading about how setting your thermostat to lower or higher temperatures can save you a lot of money each year, you may be wondering, “Well, what temperature should I set my thermostat to?” A lot of professional HVAC contractors will recommend a default setting of 78 degrees Fahrenheit for the air conditioner during the summer months. This may be a little warm for some people as the ideal daytime temperature for most Americans is between 70 and 75 degrees. Setting your thermostat as close to 75 degrees as possible, or even higher, is key to cutting energy costs and saving money. At night, the recommended temperature range for ideal sleep is 60 – 67 degrees. If you can still get a good night’s sleep with the temperature set closer to 72, then you’ll save even more money. During the cooler months, a setting of 60 – 68 degrees is recommended. If you can set it as low as possible and just throw on a sweater, or two, then you’ll really be saving on energy costs. In fact, if you can set your thermostat to as low as 50-55 degrees while you’re sleeping, you can save as much as 15% on your energy consumption!

Regardless of your temperature preferences, it’s important to be aware of how much energy your HVAC system is consuming. Taking up as much as 40% of your entire home’s energy consumption, consciously regulating the temperature of your home’s heating and cooling is not only good for the environment, but also good for your wallet.  The Department of Energy also has recommendations for your thermostat settings which you can view here.

When you’re ready to shop for your new thermostat, Pricefixer.com can help! When you get a new system quote using our free quote tool, we also include all of the thermostat options!

SEER Options You Should Definitely Check Out and Energy Efficiency Standards from the Government

It’s easy to take your air conditioner for granted. You likely never give it a moment’s thought as it hums quietly in the background cooling your home to the perfect temperature on those sweltering hot days… until suddenly it doesn’t. Next thing you know you’re on the phone with an AC company who asks you what type of system you have, and all you know is it’s an “air conditioner” – you have no idea what kind of unit it is. Well, if you’re in the market for replacing your old air conditioner, then it’s time to educate yourself about an important component of your home that’s integral to your comfort, well-being and wallet.

Let’s cover the basic parts of a central air conditioning system, how it functions to cool the air, the ever-important SEER energy rating every new AC unit has, and how to find the perfect AC system for your home.

Central air conditioning systems come in three types: split systems, packaged units and ductless systems. Let’s just look at split and packaged for now. Split systems have two separate parts; one part located outside the home that contains the condensing unit and compressor, and one part located inside the home containing an evaporator coil. A packaged unit has the condenser, compressor and evaporator coil located in one single unit that typically sits outside the home on the roof or on a slab next to the foundation.


Split System vs Packaged Unit

Split and packaged systems both work the same way, however, there are some differences. For example, split systems are much larger than packaged units, are typically cheaper to repair and maintain, and come with higher energy-efficiency SEER ratings. Packaged units are typically cheaper to install because there’s just one piece, but exposure to the outside elements could cause damage or a shortened life span, and they have lower energy-efficiency SEER ratings.


Split System:

Split System

  • Much larger than packaged units
  • Typically cheaper to repair and maintain
  • Available in higher SEER-rated models


Packaged System:

Package Unit

  • Cheaper to install
  • Exposure to the outside elements could cause damage
  • Lower energy-efficiency SEER ratings


The deciding factor as to whether a split system or a package unit is the best one for you is largely dependent on the layout and size of your home. A good rule of thumb, though, is to stay consistent with what you already have and replace a split system with a split system and a packaged unit with a packaged unit, especially if you have been generally satisfied with the level of comfort your system provides.

To discover more about the different types of systems, click here to watch a video explainer designed just for you.


How Air Conditioners Work

Air conditioners use refrigerants to cool indoor air by drawing the warm air out of your home through ducts, and supplying cool air through the registers and vents in the ceilings or floors. Besides cooling the indoor air, air conditioners also regulate the ambient temperature of the home via a thermostat. Additionally, they act as dehumidifiers, because reducing the temperature of humid air reduces its moisture content, and air filtration systems as they remove airborne particles from the circulating air through the use of filters. That’s quite a lot going on for one air conditioner!

What’s even more impressive is how the components of an air conditioner, the coils, condenser, compressor, fans, and blower, replicate the physical law of when a liquid converts to a gas, it absorbs heat (known as phase conversion) in order to generate cooling. Warm air moves over refrigerant-filled coils, causing the refrigerant to evaporate from a liquid to a gaseous state – absorbing heat as it does so – and then it is compressed and condensed back into a liquid state for the process to begin all over again. The chilled air is then circulated throughout your house by blowers located in the air handling unit.

Some useful terms are included on the Cooling Cheat Sheet below.

Cooling "Cheat Sheet"


New Air Conditioning Systems Can Save You Money

Air conditioners certainly have come a long way since the first system was developed by Willis Carrier in 1902. The device he created blew air across chilled pipes to lower the temperature and humidity levels. Today’s air conditioning systems effectively and efficiently cool your home by using state-of-the-art equipment that uses a lot less energy than the models produced just a few years ago do.

In fact, there’s a good number of energy-efficient AC models to choose from now, ranging from 13 SEER all the way to 26 SEER, with higher-rated models being manufactured every year. SEER stands for Seasonal Energy Efficiency Ratio and indicates the energy-efficiency of a particular air conditioning system. The higher the SEER rating, the more energy-efficient it is, which means increased savings on your utility bill over the life of the air conditioner. Although more expensive than base models, you can usually recoup the extra cost of purchasing a high SEER unit over several years by the lower monthly utility bills you’ll receive. Most commonly, people gravitate toward the 14-18 SEER range when purchasing equipment for their home.

If your current air conditioner has been around awhile and showing signs of needing repair, such as not cooling your home like it should on hot, summer days, skyrocketing utility bills, or clanking, banging, or rattling sounds, then it’s probably time to start shopping for a replacement. The good news is that depending on the SEER rating of your current system, newer SEER models can save you a lot of money on your energy bill! If your current air conditioner is pretty ancient, then it could be an 8 SEER. Replacing it with a 16 SEER unit would save you nearly 50% on energy costs and significantly reduce your utility bill.

Saving money with your SEER rating


How to Find Your AC Unit’s SEER Rating

To find out the SEER rating of your current split system unit, look for the yellow and black tag stuck to the side of the condenser. You will see the words “Seasonal Energy Efficiency Ratio” and the number underneath is the SEER number. If you can’t find it there, look for a performance information sheet stuck to the front of the air handler on the indoor part of the unit. Most packaged units have the SEER rating listed on the black and yellow “hang tag” located on the outside of the unit. If you’ve looked everywhere and still can’t find your SEER rating, then the Air Conditioning, Heating and Refrigeration Institute has a handy directory look up on their website here, where you can put in the make and model of your AC system to find the SEER rating.

Now that you know your current system’s SEER number, you can calculate how much more energy efficient your new air conditioner will be. Chances are, your old unit has a SEER rating that is no longer made or allowed to be made by law. In 2015, the Department of Energy (DOE) mandated that all new air conditioners manufactured in the U.S. be a minimum of 13 SEER for northern states and minimum of 14 SEER for southeastern and southwestern states.

Use the link below to see the SEER Minimums map and discover the government requirements for your state.

Seer Mimimums Map


Why Having an Energy Efficient Air Conditioner Is Important

The U.S. Department of Energy implemented energy conservation standards for air conditioners, and other appliances we typically use on a daily basis, to help save consumers billions of dollars each year and to reduce harmful effects on the environment caused by our energy consumption. According to the DOE’s website, three-quarters of all homes in the U.S. have air conditioners which use close to 6% of all the electricity produced in the United States, costing homeowners $29 billion annually. As a result, about 117 million metric tons of carbon dioxide are released into the air each year.

This is a serious concern because carbon dioxide (CO2) is a greenhouse gas that traps heat within the Earth’s atmosphere (for decades, if not centuries!) and contributes more to global warming and climate change than any other green house gas. More and more extreme weather events are being linked to climate change, and the effects of climate change are far-reaching: from rising temperatures causing a shift in precipitation patterns that change the growing patterns of plants threatening wildlife dependent on this source of food, to rising sea levels eroding shorelines and destroying ecosystems, to farms and crops producing lower yields resulting in significant economic losses.

So, limiting CO2 emissions is imperative for protecting the environment and minimizing climate change. Do your part to reduce your carbon footprint by minimizing the amount of energy you waste as much as possible. Switch to energy efficient light bulbs, walk or ride your bike instead of driving a car, take shorter showers, and install an energy-efficient air conditioning system with a high SEER rating.


Questions to Ask Before Purchasing Your New Air Conditioning System

Now that you’ve determined you’re upgrading your current air conditioning system with a more energy-efficient one, and you’ve educated yourself about the different types of central air conditioning systems, there are some important questions you should ask your contractor before your new unit is installed, such as:

  1. What size system do I need to adequately cool my home? Don’t assume the size of the old system is the right size as it may not have been measured properly.
  2. Will the current ductwork suffice? What is the condition of the current ductwork; should the ductwork be cleaned before the new unit is installed?
  3. Are there any rebates, tax credits, or savings incentives for purchasing an energy-efficient system?
  4. What kind of regular maintenance is required? Do you offer a maintenance program?
  5. What type of warranty is there and what does it cover?

With a little bit of AC knowledge and asking the right questions, you will be able to make the best choice in air conditioning systems for your home.

How to Determine Your Ideal SEER – 5 Simple Steps That Will Work for You

Think Before You Buy

Breakdown of SEER

The SEER rating on an air conditioning unit is one of the most important factors you should take into account when purchasing a new unit for your home. SEER, which stands for Seasonal Energy Efficiency Ratio, is a number that indicates the maximum energy efficiency of a central air conditioning (AC) unit while it operates over a typical “cooling season.” The higher the SEER rating, the more energy efficient it is, but also the more expensive up front. Yes, a more energy-efficient system will save you money on your monthly utility bills, and a less-than-honest sales person may convince you the savings are well worth it, but there are a few other things you need to consider in determining your ideal SEER number, in addition to that.

First, it will be useful to understand how a SEER rating is calculated. The total amount of energy output (measured in BTUs) used over the cooling season is divided by the total amount of electrical energy input (measured in watts) that is used. In other words, the amount of energy produced to cool a room to a specific indoor temperature is measured against the amount of energy consumed by the AC unit to create this cooling. This measurement is done under a variety of outdoor temperatures ranging from the 60s to the 100s, with variable humidity levels, while maintaining an indoor temperature of 80°F. The resulting average number is what determines the SEER rating.

Every AC system is tested by the manufacturer according to guidelines stipulated by the U.S. Department of Energy. The whole point of performing a test over time like this, with varying temperature conditions, is to try and gauge how much energy an HVAC (Heating, Ventilation and Air Conditioning) unit consumes when used during a typical summer season in the U.S. However, not all climates are similar across the nation, and a 13 SEER in an arid, hot climate may not be as efficient as a 13 SEER in a milder, moderately warm climate. Similarly, an AC unit’s efficiency will fluctuate based on different weather conditions; how efficiently it runs when it’s 101F outside will differ from how efficiently it runs when it’s 85°F outside. The SEER number is not a constant—rather, it’s the maximum amount of energy efficiency an AC unit can achieve, which means a 16 SEER can reach a maximum operational efficiency of 16 but will sometimes operate at a lower efficiency as well, depending on varying weather conditions.

It’s important to remember that the SEER rating is not a constant value but changes often, much like the MPG of your car changes based on how you drive it. Keep this in mind when you come across a SEER energy savings chart, or one of the many SEER savings calculators you’ll find online. These tools use the maximum SEER number to show you how much energy is being saved, as if an AC unit is going to work at its maximum efficiency 100% of the time, which just isn’t accurate. Also, many of these charts and calculators base their savings percentages on an 8 SEER or a 10 SEER, when you may have a 12 SEER. So, if you see a chart with 50% savings listed above a 16 SEER, then that means a 16 SEER is 50% (at the most)more efficient than an 8 SEER only. If you have a 12 SEER and upgrade to a 16 SEER, you’ll see closer to 25% in energy savings, which is still pretty good.


Determining what is best for your home and budget

Higher SEER units cost more than lower SEER units, but perhaps you like the fact that higher SEER units will not only save you money on your utility bills, but will also reduce energy consumption all around, which is good for the environment, and a higher energy efficient model will reduce your own personal carbon footprint. Now you need to determine the best SEER for your home, your budget, and your lifestyle.

In order to do this, you’ll need to ask yourself a few questions:

  • How long do you plan to stay in your home? Higher SEER models will provide better efficiency, but it could take nine, ten, or more years to recoup the initial cost of the unit. If you plan to move within the next five years, a higher SEER may not be worth it.
  • What is the climate like where you live? If you live in a climate where there are several months that you don’t run your AC, then the yearly savings won’t be as great as if you lived in an extremely hot and humid climate where your AC is constantly running. So, if you use your AC only part of the year, it will take longer to recoup the initial investment of a higher SEER model.
  • What’s your budget? Not just for the cost of the unit, but for the projected costs of maintenance and repair as well? Higher SEER units have components that are usually two to three times more expensive than those used in base models, therefore, repairs will be quite a bit more expensive as well.
  • How important is it to you that your appliances are energy efficient in order to benefit the environment? If this is something you value, then a high SEER unit may be right for you.


5 simple steps to determine your ideal SEER

  1. Repair or Replace: First, determine whether you need a replacement, or if your AC unit can just be repaired. The average life span of an HVAC unit is 15 years (eight-ten years in hotter climates), so if your unit is nearing or has passed that mark, then it’s probably time to replace. Other signs your unit may need replacing include frequent repairs, rising utility bills and inadequate cooling of your home during the summer.
  2. Know the Essentials: Educate yourself on the process of buying an AC and get to know the common terms used when talking about them, especially as it relates to cooling. Besides SEER, other terms you should know are:
  • Air Handler: The part of the central air conditioning system that moves the cooled or heated air through the ducts.
  • Load Calculation: Measurements taken within a structure (such as square footage, insulation, ductwork, etc.) to determine its heat loss and gain so a properly sized unit can be installed.
  • Compressor: Located in the outdoor unit, the compressor circulates refrigerant throughout your AC system.
  • Condenser: A component of the outdoor unit that keeps the refrigerant cool.
  • HVACRefers to Heating, Ventilation, and Air Conditioning.
  • EER: Energy Efficiency Rating. A measurement of an AC unit’s energy efficiency under a single set of temperature conditions. The higher the EER, the more efficient it is. Visit our post on SEER to learn more and to read about how SEER and EER differ.
  • Evaporator Coils: Allows for the evaporation of cooling agents from a liquid into a gas, which absorbs heat from the surrounding air in the process.
  • Refrigerant: A chemical used in an air conditioning system that absorbs a lot of heat when it changes from a liquid to a vapor.
  • Tonnage: The cooling capacity of an air conditioner based on a measurement of how much heat an AC unit can remove from a home in one hour. The higher the tonnage, the more cooling capacity a unit has.
    Cooling "Cheat Sheet"
  1. Search Online for Your Model: Look at your current equipment and write down key elements like model number, manufacturer, SEER rating, etc. and perform a Google search on comparable equipment. Read reviews, compare costs, analyze guarantees and research manufacturers to get a better understanding of the investment costs involved and expected energy savings.
  2. System Choice: Is your current system or was your current system operating at a satisfactory level? If you don’t feel your current system is cooling your home adequately during the summer months and your utility bills seem particularly high, then replacing your old unit with a higher SEER unit will save you money and provide better cooling. Even if your unit is a 10 SEER and you upgrade to the minimum-required 13 or 14 (depending on where you live), you will still benefit from significant cost savings.
  3. Review Your Cash Flow: Look at your cash flow – determine whether you want to invest now or spend the money over the lifetime of the equipment. Spending more money upfront on a high SEER unit will result in lower monthly utility bills over the lifetime of the unit, but it could take years before the initial cost is recouped. If you’d rather pay more now to save more later, than a high SEER unit is a wise choice.


Common questions/FAQs about SEER

  1. Are higher SEER units better made?
    Base models, such as 13 SEER and 14 SEER systems, are made with the same quality equipment as higher SEER units. When you pay extra for a high SEER system, you’re paying for increased efficiency only, not better quality.
  2. Will the minimum-required SEER rating continue to increase?
    As technology improves and manufacturers continue making higher SEER models, it’s likely that every several years or so, the minimum SEER rating will increase. In fact, there is a proposal to increase the current 13 and 14 SEER minimum to 14 and 15 by 2023. Increasing the energy efficiency of all appliances is a move in the right direction for the environment and for consumers.
  3. How can I find out the minimum SEER rating for my state?
    Click here for this informative brochure by the U.S. Department of Energy.
  4. Are there rebate incentives for higher SEER units?
    Yes, higher SEER units typically come with incentives and/or rebates offered by federal, state, and local governments. Many utility companies offer rebates as well.
  5. Do I have to upgrade my unit to the minimum SEER now?
    No, if your older model is still working fine, then you do not need to replace it. However, it’s important to note that your old unit is likely going to cost you more to operate than a newer, more energy-efficient model would.
  6. What is a good SEER rating?
    14 and 16 SEER are good ratings for most people. Of course, everybody is different and certain factors such as personal lifestyle choices, concern for the environment, budget, and local climate should be considered. You can find 14 and 16 SEER systems that are well-made, energy efficient units that are both good for the environment and good for your wallet.

Simplifying SEER and Understanding Your HVAC Unit

Family Hugging


The Definition of SEER

What is SEER? The short and simple explanation of SEER is that it’s a number assigned to an AC unit indicating its energy efficiency. The higher the SEER number, the more energy efficient the system is, which is important because an energy-efficient unit will not only reduce your monthly utility bills, but will also reduce your carbon footprint, thereby benefitting the environment. Naturally, then, it would make sense to purchase an AC unit with the highest SEER rating available, right? Well, not necessarily. As we explain a little more about the SEER rating, you’ll understand why a high-rated SEER unit may not be the right one for you.


S-E-E-R – Breaking it down

SEER stands for “Seasonal Energy Efficiency Ratio.” The key word to remember in this acronym is “Seasonal,” as the SEER number is determined by measuring an AC unit’s efficiency as it operates over a period of time with varying degrees of temperature and humidity levels, which mimic a typical summer season for most areas in the U.S. This is typically referred to as the “cooling season.”

SEER ratings are calculated by measuring the amount of cooling provided (energy output, measured in BTU’s), during a cooling season and dividing it by the amount of energy consumed (energy input, measured in watts), over this same period of time. An AC unit that uses less energy to produce the same amount of cooling than another unit over the cooling season, operates more efficiently and will have a higher SEER number. Of course, the higher the SEER number, the more expensive the unit, but oftentimes the savings recouped from a more energy-efficient unit make up for the higher upfront cost. For example, if you replace a SEER 10 unit with a SEER 13 unit, then the same amount of cooling will be produced while using 30% less energy! That’s a 30% reduction in harmful emissions and a 30% reduction in your utility bill.  If you have a unit with a SEER rating that’s less than 10, and you upgrade to a SEER 13, or higher, then the energy and cost savings will be even greater.

When shopping for a new AC unit, the SEER rating is an important piece of information that allows you to compare the energy efficiency of air conditioners and help determine an AC unit’s approximate annual operating costs.


SEER vs. EER

Oftentimes alongside the SEER rating, you will see an EER rating. EER stands for “Energy Efficiency Ratio” and is a number that measures an AC unit’s energy efficiency at a specific temperature, instead of over a period of time with different temperatures (hence, no “S” for seasonal). EER was created in 1975 by the Air Conditioning, Heating & Refrigeration Institute (AHRI) as a way of measuring the cooling efficiency of HVAC units. To determine the EER rating, the amount of cooling provided (energy output) is divided by the amount of energy consumed (energy input) while operating under a singular set of weather conditions, which is typically an outdoor temperature of 95°F, an indoor temperature of 80°F, and a humidity level around 50%.

Realizing that the EER rating doesn’t take into account certain variables, such as seasonal weather fluctuations and the resulting heat loss or gain that occurs when a system frequently cycles on and off, the SEER rating was developed in 1978 to more accurately gauge a unit’s efficiency during a typical summer season. The SEER rating, then, differs from an EER rating in that it is an average calculated over time; SEER is a measurement of an AC unit’s efficiency as it maintains a constant indoor temperature over the course of a cooling season with varying outdoor temperatures ranging from a low of 65°F to a high of 104°F with humidity levels ranging from 30% to 80%.

Just as with SEER ratings, a high EER rating indicates a more energy-efficient system and is a useful way to determine the efficiency of an AC unit when comparing across brands. However, the SEER number is a better indicator of an AC unit’s overall operational cost as it takes into account how well the unit works under a variety of weather conditions over the course of typical year. Just remember to always compare one unit’s EER to another’s EER, and SEER number to SEER number when looking at multiple units.


SEER by the Numbers (13/14 SEER, 16 SEER, 18 SEER, 21 SEER)

As previously mentioned, a SEER 10 unit replaced with a SEER 13 unit results in a 30% energy savings. What if you wanted to go even higher? Below is an example of the potential energy savings and cost savings of replacing a SEER 10 unit with a higher SEER-rated unit.

Based on a 3-ton AC with a SEER 10 rating that consumes around $1,323 in electricity per year:

  • A SEER 18 unit will produce 44% in energy savings per year and consume around $735 in electricity per year.
  • A SEER 21 unit will produce 52% in energy saving per year and consume around $630 in electricity per year.
  • A SEER 25 unit will produce 60% in energy savings per year and consume around $529 in electricity per year.

Increasing Your Savings With SEER


What does SEER have to do with MPG?

It’s important to note that an AC unit’s SEER rating represents the maximum efficiency of that particular unit. This means that an AC unit with a SEER 22 rating can reach an efficiency level as high as 22, but may not always operate at a 22. So, just like Miles Per Gallon (MPG), which is used to measure the gas efficiency of a car, the higher the MPG rating, the more miles per gallon you can get out of it; but only when it’s being driven under ideal travel conditions (good weather, safe speeds, level ground, etc.). If, on the other hand, you drive your 36 MPG rated car like one of the characters from the Fast and the Furious, then your car’s average MPG number will be much lower, perhaps in the 20s.

There are things you can do to help your AC unit run at its most efficient rating, such as maintaining a regular temperature in your home, keeping the air filters clean, and checking for leaks in the ductwork.


Benefits and Regulation

Created and regulated by the Department of Energy in 2008, the SEER rating helps consumers cut down on energy consumption and costs while providing better cooling for their home. Also, by raising the minimum SEER rating across the U.S., the depletion of natural resources will be reduced as will the emission of harmful gases into the environment. It is required by law that all central air conditioning units be evaluated, rated, and assigned a SEER number by the manufacturer in accordance with efficiency tests stipulated by the U.S. Department of Energy.


FTC and the US Department of Energy

In 2015, the DOE established new minimum efficiency ratings for three different portions of the U.S. – the North, the South, and the Southwest. For new central air conditioners manufactured and sold in the warmer, southern regions, the minimum SEER was raised to 14. For northern regions, the minimum remains a SEER 13. The standard SEER breakdown across the nation is as follows:

SEER 13 minimum: Alaska, Colorado, Connecticut, Idaho, Illinois, Indiana, Iowa, Kansas, Maine, Massachusetts, Michigan, Minnesota, Missouri, Montana, New Hampshire, New Jersey, New York, North Dakota, Ohio, Oregon, Pennsylvania, Rhode Island, South Dakota, Utah, Vermont, Washington, West Virginia, Wisconsin and Wyoming

SEER 14 minimum: Alabama, Arizona, Arkansas, California, Delaware, Florida, Georgia, Hawaii, Kentucky, Louisiana, Maryland, Mississippi, North Carolina, Nevada, New Mexico, Oklahoma, South Carolina, Tennessee, Texas, and Virginia.

It is not required that consumers immediately upgrade to a more efficient unit, rather the minimum rating only applies to new units being manufactured and sold in the U.S. after January 2015.

Also, the Federal Trade Commission’s EnergyGuide label (the yellow “hang tag” attached to heating and cooling systems), will now display a range of numbers representing the lowest and highest SEER rating for split-system air conditioners, instead of a single rating.


Types of AC

Now that you know about SEER and EER ratings and how they relate to an AC unit’s efficiency, understanding the different types of air conditioning systems available will help you decide which option is the best one for your home.

Window Units: Also known as “room air conditioners,” this type of system contains all the necessary AC components (compressor, condenser, evaporator, and cooling coil) into a single box that is placed either in a window or wall of a room. Blowing cool air directly into a room, this type of system is effective for cooling small spaces and homes. Window units only have an EER rating.

Central Air Conditioners: Distributing cooled air via a system of ducts, Central AC systems work best for larger homes and buildings.The two most common types of Central Air Conditioning systems are split or packaged units.

Split systems: A split system has an indoor component, which includes the evaporator coil and blower, and an outdoor component, which includes the condenser coils, condensing fan, and the compressor housed in a metal case. This type of system is economical because it shares the ductwork used by the heating system.

Packaged units: A packaged unit is usually located outdoors and combines the evaporator coil, condenser, and compressor into a single cabinet. Air is drawn from the inside through ducts in the wall or roof and returned, cooled, to the inside of the house. Packaged units also typically include heating coils eliminating the need for a separate indoor furnace.

Ductless Mini-Split Systems: Ideal for houses with no ductwork, the mini-split system uses tubing to combine the outside compressor and condenser to indoor air-handling units, which are typically mounted high on a room’s interior wall and circulates the cooled air with a fan. Each room, however, will have its own air handler, much like a window unit, with the ability to cool a room to a temperature different from other surrounding rooms.

When determining the type of air conditioning system for your home, it’s important you choose a system that’s best fits the size of your home. A system that is too large or too small will not adequately cool or dehumidify your home.


Getting Another Bid

Now that you have a better understanding of how the SEER rating can affect your energy savings and reduce your monthly utility bill, it’s important to shop around to find the lowest-priced air conditioning system with your ideal SEER number. Don’t accept the first bid you come across – get another one, and another one still from a variety of AC retailers, including online retailers. You will be shocked at just how much money you can save by cutting out the “middle man” and ordering your new AC unit online. Check out these lowest-guaranteed prices here!

DIY Air Conditioner Repair

Your air conditioner is a very important installation in your home. It helps maintain a comfortable indoor temperature and the indoor air quality too. It’s normal for us to get flustered and stressed when something goes wrong with our HVAC system and in most cases, we simply call in a professional to inspect the system and fix the problem. While that is always the best approach, there are some basic air conditioner repairs you can easily handle yourself.

DIY AC Repair Tips

All you need are some tools; an understanding about the things that can go wrong and what the standard troubleshooting steps are. Here is a guide on DIY air conditioning repair. Following these can help you save some money on a service call and the associated expenses. Here we talk about common “no cooling” and “low cooling” issues.

Central AC Systems- the failures and how to fix them

If your replacement AC fails, and are comfortable with doing a few basic repairs and are okay with spending under $100 or less on any spares you may require, all it will take you is a couple of hours to fix your air conditioner. The steps to follow are:

1. Ensure the problem isn’t due to the furnace

    Set the thermostat into A/C mode & then reduce the temperature setting. If the furnace’s fan starts up the problem doesn’t lie there. However if the fan doesn’t kick-in, you should try to re-set the furnace’s circuit breaker. If that doesn’t work, you’d have to call in a professional to fix the system.

2. Check the condensing unit located outdoors

The fan and the compressor (that sounds very much like a refrigerator) should be running. If it isn’t, go through these steps:

    Turn off the system’s power at the main electrical panel. Use a voltage tester on the wires coming into the contactor to make sure the power is really off. The start/run capacitor & contactor (relay) are the ones that fail most commonly and are quite inexpensive to replace. If your wholesale air conditioner is over 5 years old, it’s a good idea to simply replace these components. While the condenser’s fan motor can fail as well, it can cost up to $150, so it’s best to defer purchasing it unless you are sure it’s the real culprit. Ensure you are buying compatible parts based on the model and make of AC unit you have.

3. Other checks for no cold air/little cold air problems

    • Look for the electrical box adjacent to the AC condensing unit; pull & disconnect its block. Use a voltage sniffer to ensure there is no current in it. Ensure that all the registers within the house are fully open. Make sure the furnace filter is completely clean. Go outside and thoroughly clean the

condenser coil

    s. If many registers were shut or if the filter had gotten clogged with dirt and debris, the reduced flow of air can cause the coil to get iced-up; this can impact the cooling in your home. If you’ve replaced the filter & ensured that all the registers are open, but still can get any air-flow started, you would have to de-ice the system’s A-coil. Change the thermostat’s mode switch from the “Cooling” function to the “Off” position and turn the fan’s switch from the “Auto” function to “On.” Next, allow the blower to run for a minimum of 30 minutes or until the point you detect a good airflow at all the registers. Then turn the air conditioner back on and test it. If it works consistently and without problems for the following 12 hours, you’ve solved the unit’s problem.

Condenser coil fixes

    • Clean the

condenser coil

    • s (even if you find they are already clean). Now turn off the power. Turn the furnace and A/C’s circuit breakers in the main electrical panel into the “Off” position. Turn off the main power switch located in the air-handler/furnace. Yank the disconnect block out & clean the

condenser coil

    s.

If the unit still doesn’t function well after you’ve thoroughly cleaned the condenser coils, replaced the filter & opened all the registers, these are the steps to follow:

    Test the fuses located in the disconnect block. When you use the millimeter multimeter, a zero/ infinity symbol (∞)/ minus symbol indicates a blown fuse. Some disconnect blocks have 2 cartridge fuses. Check these before you proceed with any repairs. A blown fuse is typically a sign of some failing part within the condensing unit

Don’t simply replace it and sit pretty thinking the problem’s been solved. Instead, replace the components mentioned below. After that install new fuses and start-up the unit; if the fuse blows again, you would have to call in a professional, as the issue is too severe for you to handle.

Before you replace any of the components, check for evidence of chewing on electrical connectors/wires and for rodents’ nests.

    If you find any chewed insulation or broken wires or can safely handle basic electrical repairs, first discharge the capacitor first. Repair the wires & then clean out the rodent’s nest. Replace the start/run capacitor(s) Replace the air conditioner contactor

4. Replace the Fan Motor

The final DIY air conditioner repair that might be required to fix the system is a fan motor replacement. The steps to follow are:

    • Mark the blade to indicate which side is up. Next loosen the fan blade’s setscrew. Carefully pull it off the motor’s shaft. Swap in the new motor. The motor wires should be routed through the older conduit and secured with zip ties where required. Affix zip ties or the fan blade could sever the wires. Reinstall the disconnect block and access panel. Turn on the system’s circuit breaker & the furnace switch. Set the thermostat to a much lower temperature and then wait for the A/C to start. The

compressor

    •  should start & the condenser’s fan should spin. If you find that the

compressor

     runs but the fan doesn’t, the latter’s motor is most likely shot. Turn off the power & remove the condenser cover screws. Lift the cover & remove the motor and the fan blade and motor. Now, reinstall the blade & then secure the cover. Repower the system and see if the fan runs (they have a built –in delay function and it can take up to 10 minutes after you have restarted the system for the thermostat to get started up)

If the wholesale AC still doesn’t start up, you would have to call in a technician to handle the job.

What is a Home Air Conditioner Tune Up?

Air conditioning units require service and maintenance once or twice every year. That’s especially true if your air conditioner runs continuously and often. It’s more likely to collect dust and debris if it has to work day in and day out to maintain your indoor temperature. Regular maintenance and tune-up will ensure you don’t have to invest in an AC replacement anytime soon.

You should call the home air conditioner tune-up technician before every summer to ensure your appliance is ready for warmer days. A properly maintained air conditioner will cool your property evenly, consume less energy, maintain comfortable indoor temperature, and maintain indoor air quality as well. If you don’t perform a tune-up, the air conditioner might malfunction in the middle of summer. Here’s what’s included in a home air conditioner tune-up.

1. The Blower Motor and Belt

The blower motor controls the circulation of air within the room so it must function properly for the room to cool efficiently. The technician will check the motor and the belt carefully for any signs of wear. They will replace all damaged parts and clean the motor and belt thoroughly during the maintenance run. As long as your blower motor works well, you don’t have to worry about problems with it.

2. The Coolant Level

The air conditioner should have enough coolant or refrigerant to properly cool the entire room or property. If the coolant levels are too low, the compressor will struggle to maintain the right temperature. That would place excess load on the system and shorten its lifespan. You’ll be forced to invest in an AC replacement sooner than you need to. Regular maintenance will ensure the coolant levels are stable and the compressor doesn’t have to bear any unnecessary load.

3. Inspecting the Ductwork

Many professional inspection and maintenance companies ignore the ductwork because inspecting, cleaning, and repairing it requires too much effort. However, poorly-maintained ductwork can cause a lot of problems down the line. Ductwork can collect dust, debris, and germs, which can compromise the air quality of your home. It can also contain holes and gaps that leak conditioned air out of the duct system. That can have an impact on the temperature on your home. A professional technician will carefully inspect the system and seal all the gaps and damage.

4. Inspecting the Electrical Connections

Electrical connections and wires can become frayed over time and cause problems. Damaged and exposed wires can be a major fire hazard and that can also compromise the supply of electricity to the compressor. That can lead to extensive damage in the long run and even cause explosions if you’re not careful. An experienced maintenance professional will carefully inspect all the wires and connections to make sure there are no loose connections, damaged or exposed wires, and disconnections. They’ll replace all damaged sections with new wires and ensure the system is completely safe for use.

5. Checking the Thermostat

The thermostat controls the temperature output and cooling. It also controls the cycling of the air conditioner. Once the room temperature reaches a predetermined temperature setting, the system will automatically shut down and sit idle until the temperature rises once again. If the thermostat isn’t working well, this cycling will be erratic and the temperature reading on the air conditioner will be different from the actual temperature of the room. The technician will check the differences between the two aspects of your system and ensure the thermostat controls the air conditioning system properly.

6. Cleaning the Condenser Coils

The condenser coils can become dirty, iced, and flat over time. That can obstruct airflow into the room, compromise the cooling, and have an impact on the overall air quality of your property. These coils need to be cleaned meticulously and straightened to get the best possible cooling. AC maintenance professionals will clear the condenser coils, remove all traces to ice and frost, strength the coils, and ensure the air passes through them easily. This will improve the performance of the air conditioner by a considerable margin.

7. Cleaning the Filters

You can clean the air conditioner filter at home without easily. You just need to remove the filter and vacuum it or dust it with a brush. However, sometimes the filter is just too worn down and damaged to be effective. In such cases, you need to replace it entirely. A repair or maintenance technician can provide a filter than fits in with the specific brand and model of your air conditioner.

8. Lubricating the Moving Parts

The air conditioning unit contains a number of moving parts and this includes the blowers. As you might be aware, moving parts generate friction if they’re not properly lubricated. This friction can cause a lot of wear and tear, and eventually damage the air conditioning unit beyond repair. You’ll be forced to find an AC replacement if you don’t keep your system properly lubricated. The technician will clean all traces of previous lubricants and any dirt or debris before they apply a fresh coat of the substance.

9. General Cleaning

Once all problems are addressed, the technician will perform a general cleaning of all parts of the air conditioner. They’ll also remove any debris and dust on and around the condenser unit, the split unit, the ductwork, etc. This ensures that your air conditioning unit works at maximum efficiency and your indoor air quality is healthy.

10. Looking for Traces of Excess Moisture and Mold

Air conditioning systems are prone to excess moisture, especially if the condenser pipes are clogged and the water isn’t drained properly. The excess moisture can lead to bacteria and mold. Experienced technicians examine the unit carefully to find any traces of mold and clean the area immediately. They’ll also address the root cause of the problem and clear all clogs in the drains.

If you want professional installation and expert consultation on HVAC systems, don’t hesitate to contact Pricefixer or call us at 877 774 2334. We’ll be happy to help.


What is Involved in HVAC Maintenance?

Maintenance

The HVAC system, like any other installation, requires regular maintenance and care. If you don’t clean and maintain the system, its performance will start to slip and eventually the entire system will fail. This will force you to spend money on heating system replacement. Regular maintenance ensures the HVAC delivers consistent performance and lasts after a long time.

The HVAC keeps the environment with your property comfortable and clean. It ensures all stale air is recycled and helps maintain the indoor temperature regardless of the hot or cold climate outside. As HVAC is such an important aspect of any residential or commercial building, it’s important to that invest some time and money in its maintenance.

The best way to ensure your system works well is to hire a professional to handle the job. You can opt for annual HVAC maintenance contracts at an affordable cost. Here’s what you can expect from HVAC maintenance:

1. Inspecting and Changing Filters

Filters can get dirty easily, especially if you live in a location that can be dusty. The HVAC system filters trap all kinds of dust, debris, germs, and clean the air. They’re responsible for maintaining the indoor air quality. If they’re not cleaned and replaced regularly, your HVAC system will eventually stop performing as you expect it to. The heating and cooling will be inefficient and the indoor air quality will worsen. Inspecting and changing the air filters is one of the most important aspects of HVAC maintenance.

2. Visual Inspection of the Entire System

You should get your HVAC system visually inspected at least once every year to make sure all the systems are working well. This inspection is an important aspect of HVAC maintenance. If you don’t get your system inspected, you won’t notice a problem until it stops working in the middle of winter. That’s the last thing you want because you will have to hunt for alternative heating sources until the system is repaired. Regular inspection and maintenance also helps keep it in good shape and prolongs its life.

3. Cleaning and Removing Debris

Dust and debris don’t just settle in the filters. They can also collect on blowers, moving parts, condensing units, and other such important aspects of your HVAC system. A light layer of dust is unavoidable but too must debris can cause a lot of damage to the HVAC system. A professional will carefully clean all the accumulated dust and debris and make sure there’s no corrosive damage to the internal systems.

4. Checking the Condensate Drain

The condensate drain in your air conditioner and heat pump should be free of all clogs and debris. Clogs can obstruct the flow of condensed water and cause moisture accumulation within the system. Excess moisture can cause problems like mold, water damage, high levels of humidity in the property, uneven temperature regulation, bacteria, and compromised air quality. A professional maintenance technician will flush and clean the condensate drain to ensure all excess moisture flows away from the system.

5. Checking the Thermostat Settings

Most HVAC systems now have programmable thermostats that allow property owners to control the temperature and set it on a schedule. For example, you can set the thermostat to lower the heat when you’re not in home to save money on the energy bills and ensure the system isn’t overburdened. A professional technician will check the thermostat during the annual maintenance to ensure the actual temperature and the temperature on the thermostat matches. If there’s a difference in the temperature, the technician needs to check the thermostat’s performance or assess the entire HVAC system.

6. Checking the Electrical Connections and Voltage

Most people don’t realize that the HVAC connections and systems can come loose or break over time. That can compromise the performance of the system and eventually damage it enough that you need to invest in furnace replacement or AC replacement. The maintenance technician will carefully examine the connections and evaluate the performance of the system. They’ll look for frayed and damaged wires and replace them in order to minimize the risk of fire and component failure.

7. Lubricating Moving Parts

HVAC systems have moving pasts in compressors, circulation units, and furnaces. These moving parts need to be lubricated regularly to minimize friction and the resultant wear and tear. The technicians will carefully clean and remove all traces of debris from the moving parts and apply the required amount of lubricant to control friction. This process should be repeated often to protect the HVAC system from excessive damage.

8. Inspecting Exhaust Outlets

The exhaust outlets allow all dangerous gases to escape your property so there’s no risky buildup of carbon monoxide and other such gases. If the exhaust outlets are clogged, they can lead to a dangerous build-up and compromise your safety. The technician will assess all of these aspects of your system and check the chimney flue and vent stack as well. They will look for signs of corrosion, leaks, and back draft and repair the problem during their maintenance runs.

9. Checking Fuel Lines and Connections

The fuel lines that supply gas to your furnace should also be inspected regularly. Leaking gas and fuel can be a fire hazard. Disconnected fuel lines can compromise the efficiency of the HVAC system as well. Soot can accumulate in burners and cracked heat exchangers can have an impact on the system’s efficiency as well. The maintenance technicians will assess all of these aspects of the furnace and carefully and remove all clogs and traces of soot.

10. Checking the Refrigerant Levels

Your air conditioner should have enough refrigerant in it to cool the air efficiently. If there isn’t enough refrigerant, the compressor will have to work harder to achieve the desired level of temperature. That can cause extensive damage to the system and eventually force you to replace it.

If you want professional installation and expert consultation on HVAC systems, don’t hesitate to contact Pricefixer or call us at 877 774 2334. We’ll be happy to help.


What are HVAC Services?

The HVAC system is one of the most important installations in any building. If you don’t have a functioning and efficient system, your indoor environment just won’t be comfortable and livable. Like all appliances, the HVAC system also requires some care and maintenance. You can hire a professional technician to handle the servicing for you. Experienced and well-trained professionals will examine the entire system from top to bottom to ensure it works efficiently.

What is HVAC Service?

The HVAC service includes all the inspection and repairs needed to ensure your system works well. The service is carried out at a predetermined schedule based on your particular requirements. For example, residential property owners don’t need HVAC servicing as often as commercial property owners do because their system endures less wear and tear. Regular maintenance minimizes the chances of breakdowns and malfunctions. It also extends the life of the unit so you don’t have to invest in heating system replacement anytime soon.

What Does An HVAC Service Consist Of?

A HVAC service consists of everything you need to maintain your property environment. A well trained professional can handle all kinds of challenges and come up with custom solutions that fit into your budget. Here are some things your HVAC Service will include:

•    Thorough Inspection – This is one of the most important aspects of HVAC servicing because it helps the technicians understand the current state of your system. They’ll examine every corner of your HVAC system from the furnace and compressor to the duct system and filters. They’ll take careful notes of all the flaws and problems that they need to address.

They can use these notes as future reference for other inspections and assessments of the same property. For example, the experts can refer to this report on the next inspection six months later. A good record of all inspections and assessments can help the technicians keep the HVAC system in good shape.

•    Repairs – The inspection will reveal areas that need attention and repairs. These repairs are always the first priority of HVAC servicing professionals. They’ll replace worn down parts, seal any leaks, and fix all problems they find quickly to limit the extent of the damage. If you don’t get your system inspected regularly, you won’t notice and repair these problems until it’s too late. You’ll be forced to spend money on heating system replacement because your system will deteriorate faster. Small problems can grow big if they’re ignored for too long.

•    Maintenance – The maintenance aspect of this HVAC service process includes fixing any loose electrical connections and wires, lubricating all possible moving parts, and other such actions. The technician will also remove any rust accumulation, mold, bacteria, and excess moisture to ensure the system functions well. These small tasks can help ensure there are no lingering traces of damage in the system and your HVAC doesn’t sustain any damage over time.

•    Cleaning – After the repairs and maintenance is done, it’s time to move on to cleaning and dust removal. The technician will thoroughly clean as aspects of the HVAC, including the filter and coils. They’ll make sure there’s no dirt in and around the compressor unit as well. Dust can be corrosive and eventually cause a lot of harm to your HVAC system.

For example, too much dirt can clog the exhaust vents or the drain lines and lead to hazardous situations. All of this debris must be cleaned regularly in order to keep your HVAC unit functioning well. Too much dirt can also compromise the air quality of your property and cause allergies.

•    Replacement – If your HVAC system is truly beyond repair, the technician can help you replace it with a wholesale furnace and HVAC system. They’ll recommend the best products based on their past experience and the products performance in real-life situations. They’ll also consider your budget and requirements carefully before they install the system. They’ll measure your property, consider the number of windows and doors, make note of all the hot and cold spots before they recommend a HVAC unit.

What are the Advantages of  HVAC Services?

Most people don’t want to spend money on HVAC serving and believe that their system will last for a sufficient amount of time even without proper servicing. However, thorough servicing offers a number of advantages that are worth the investment. Here are some of these HVAC service advantages:

•    Minimizes Breakdowns – The last thing you want is for your HVAC system to break down in the middle of summer or winter. This system keeps your indoor environment comfortable regardless of the outdoor temperatures so it must reliable and deliver the performance you expect. Regular maintenance helps minimize the chances of breakdowns and other such problems.

•    Extends the Lifespan – Regular maintenance extends the lifespan of the HVAC system. If your system isn’t cleaned and repaired regularly, the components will wear down more quickly and reduce the lifespan of the appliance. You can increase the lifespan by several years if you get your HVAC serviced once or twice a year. We recommend once before winter and once before summer because the system will endure more strain during these two seasons.

•    Convenient – Most HVAC services are offered on contract so you don’t need to call the service provider every time you want your system to be serviced. You can schedule the services in advance and set the date according to your convenience. The technician will arrive at your location in fully equipped vehicles and carry out the repairs, clean-up, and maintenance efficiently.

These are just some of the many advantages of HVAC services. These contractors are quite affordable can help you save money in the long run. You won’t be forced to replace your old system or spend money on expensive repairs. You won’t have to worry about unexpected breakdowns or problems.

If you want professional installation and expert consultation on HVAC systems, don’t hesitate to contact Pricefixer or call us at 877 774 2334. We’ll be happy to help.

Pricefixer Van
Discover a better way to buy HVAC today.
Build Your System