Get an instant price

AFUE: The Five Essential Questions Your Service Company Should Ask You Before You Buy In

Right here, we have all the answers to your questions on AFUE, including a quick video on Ron’s Story, the five essential questions you should be asked before your job is priced, and US Department of Energy guidelines that will help you along the way. AFUE can be confusing at first, but once you are armed with the knowledge you need to make an informed decision tailored to your specific situation, you will feel empowered. 

“The Five Essential Questions Your Service Company Should Ask You Before You Buy Into AFUE” includes –  

  1. A Brief Overview of AFUE 
  2. Ron’s Story/Quick Video Explanation 
  3. The Five Essential Questions 
    1. How? 
    2. When? 
    3. What? 
    4. Are? and… 
    5. Did? 
  4. US Department of Energy 
  5. Understanding ENERGY STAR  
  6. Your furnace or boiler (Do you need to buy the same equipment you have?) 
  7. Get a free quote instantly, without a tech visit to your home 


A Brief Overview of AFUE 

When you’re on a quest for information about AFUE you’re most likely in the fact-finding phase of HVAC replacement or repair. HVAC stands for Heating, Ventilation and Air Conditioning, which not many are aware of, and refers to the heating and cooling industry as a whole. So, let’s discover the meaning of AFUE together and start a discussion on why it’s important to have a clear comprehension of what it is. Additionally, what are the questions you need answers to before you make any decisions about your home heating system? In this blog post, we have the five essential questions your service company should ask you before you buy into AFUE. If they don’t ask you these questions or haven’t asked you them yet, you may want to consider a second opinion on your furnace or boiler diagnosis.  

afue photo

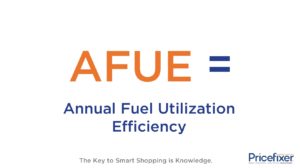
AFUE is a commonly used acronym within the HVAC industry. The Annual Fuel Utilization Efficiency is a percentage that expresses the amount of heat you will benefit from throughout your home versus the amount that will escape through the flue.  

Wait, what?!  

Yes, something has to keep the birds warm. (You can insert your smile here.) It is true, the heat escaping through the flue from lower efficiency equipment is a major ouchie for your heating bill. The good news, though, is the higher efficiency level your equipment is, the less fuel you will literally lose to the birds. That might mean you pay more money for a furnace up front, but over the lifespan of your system, you’re spending less on fuel. 

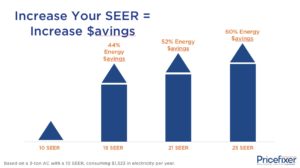
The heat produced by your furnace in correlation to the level of fuel used is the AFUE. Some older homes have furnaces with extremely low or even unmeasurable levels of AFUE, which means those homeowners are spending much more money on fuel than recommended by US government agencies like the Department of Energy. New Energy Star rated equipment is rated between 80-98% AFUE, as opposed to older homes with no AFUE rating on their equipment at all. Homeowners with much older systems waste a lot of fuel to these lucky (and warm) “birds we are referring to. 

Upgrading to a new system can save you a lot of money on fuel, which means you will be getting more bang for your buck, but how will you know whether its time to replace your furnace or simply repair it??  

Before you even get to this decision-making step, there are a few questions your service company should ask you as a homeowner in a time of need  

Here’s a quick tip to keep in the back of your mind throughout the process. As of the year 1992, the US Department of Energy set the standard that all furnaces sold in the US must be minimally 78 AFUE. Other specific types of furnaces have different standards, and as of 2015, even higher levels of AFUE are required between 80-83 AFUE. So, to comply with these standards, when purchasing new equipment should operate at this efficiency level.   

If you’re looking for a deeper dive into the meaning of AFUE, there is a plethora of information on the What is AFUE post. Click Here.


Ron’s Story

Learn more about AFUE and the Five Questions Your Service Company Should Ask You By Watching THIS VIDEO about Ron’s Story.

As some of you can relate, Ron’s story is not uncommon to those with older homes. But like Ron, you, too can take this crash course on heating terminology and get yourself up to speed to make an informed decision. With that in mind, we’ve curated a list from industry experts on the top 5 questions you have to listen for… Your service company should be asking you these 5 questions, and if not, perhaps it’s time to make sure they know your answers. 


The 5 Questions 

  1. How frequently do you operate your furnace? Is it running year-round, or is it running more seasonally, or occasionally? 
  2. When did you move into your home and how long do you plan to stay put? 
  3. What is your budget for a new heating system? 
  4. Are you aware the repairs on a higher AFUE heating system are more expensive than on a minimally required AFUE percentage? 
  5. Did you know you can cut out added costs by shopping online for your ideal AFUE system?  


These questions lead to your system diagnosis and a recommendation or repair or replace. Please bear in mind, however, that if your system is 10 years or older, most will advise you to replace.  

Many sales people will tell consumers that they’ll save a lot of money by installing a high-efficiency furnace. But if you’re replacing an older furnace that has an AFUE rating between 55-70%, then installing an 80% AFUE furnace will already be a substantial upgrade, and you will immediately see a huge savings on your utility bill.   

If you plan on living in your home less than five years, the payback time period may not be enough to justify the additional cost of a high efficiency furnace if you buy from a contractor.  

The distribution channel for furnaces consists of a manufacturer, distributor, and then a dealer (the installing company). Each channel adds a markup. The dealer usually adds a 100% markup. Costs vary, but compared to an 80% furnace expect to pay $1,100 dollars or more for a 90% AFUE furnace.  A 95-99% AFUE furnace will probably cost you between 150-200% more than an 80% AFUE furnace.     

When they ask about your budget, just be honest. What do you expect a new system to cost? What about a repair? The thing you must know here is that the repairs on a more efficient system, or – one with a higher AFUE, will cost more money than they will on a lower AFUE system.  

That brings us to the final of the five essential questions your service company should be asking you before you repair or replace. So, here’s a question or two for you to ask yourself. Are you a sharp, smart consumer? Do you pride yourself in seeking knowledge before you invest your money in a large purchase? If yes, then you will be rewarded by arming yourself with information and seeking pricing for HVAC replacement equipment online. This is a great way for you to see a real breakdown of what you should expect to pay for a replacement.  


Understanding ENERGY STAR 

When you are looking for information on energy efficient equipment to replace your existing system or occupy a new home, you will want to have a concise understanding of government standards. ENERGY STAR certified, guaranteed products are not only good for you and your home, they have beneficial-for-the-environment operational standards. They meet strict criteria in order to carry this label. For detailed information on products that carry the label, you can visit their website (Link to: energystar.gov ) 

Here are a few criteria furnaces must meet in order to carry an ENERGY STAR label:

Gas furnaces in the southern United States must be a minimum of 90% AFUE. In the northern parts of the US, gas furnaces need to operate at 95% AFUE (as a minimum efficiency level standard). Oil furnaces must have an 85% or higher AFUE rating. For a specific breakdown of the US states per region, please click here.


Your furnace 

As a general rule of thumb, if your equipment was or is heating your home comfortably, it is the proper size you’ll need for a replacement. You can search the model number written on the product tag online to see what type of system you have.  

Money conscious consumers who want to avoid paying a retail markup are encouraged to get a bid and compare online at Pricefixer.com. At Pricefixer.com there is never a retail markup, or commissions paid to sales people that drive up the price – just complete transparency and the guaranteed lowest prices on central heating. Search for replacement equipment in the comfort of your own home or office, or from the library, or from Starbucks, or the car! You can access the information you need on your phone or tablet, on-the-go or on your couch. Call or chat if you have questions. 

Now that you know the essential questions your service company should be asking you – what are you going to do to resolve your home or office heating woes?

How Your Heat Pump Keeps You Cool

Heat pumps are often thought of as being a device which help keeps your home warm during the cooler months, but what is often overlooked is the fact that heat pumps are also one of the most energy-efficient ways to cool your home during the warmer months as well.


Definition of a heat pump

A heat pump is a mechanical system that moves available heat from one area to another. Since heat flows naturally from a higher temperature to a lower temperature in an effort to reach thermal equilibrium, heat pumps use very little energy to push or “pump” warmer air around. During the winter months, a heat pump provides warm air by removing heat out of the air or ground and transferring it into your home. During the summer, the heat from your home is transferred outdoors leaving cooler air behind. Moving heat from place to place instead of generating heat, as a furnace or central air conditioning unit would do, uses significantly less energy providing huge cost savings over other types of HVAC systems.


Brief history of the heat pump

In the 1940s, Robert C. Webber, an American inventor, noticed that the outlet pipe of his freezer became very hot when he lowered its temperature. He soon realized the potential applications for the heat which was being discarded. Running pipes from his freezer to his boilers, Webber captured this displaced heat to provide his family with hot water. Next, he piped hot water into coils and used a fan to blow over the coils sending warm air into his home. Soon after, Webber figured out how get heat from underground and use to warm the air thereby inventing the first ground-source (geo-thermal) heat pump in the late 1940s. Soon after, electrical and gas heat pumps were developed.

It hasn’t been until the past 10-15 years, however, that heat pumps have gained significantly in popularity due to their eco-friendly manner of operation, their ability to both heat and cool, and their cost-savings energy efficiency. Additionally, advancements in heat pump technology are improving their performance even further. Newer, high-efficiency models utilize the heat that is wasted heat when the system is in cooling mode to heat water at two to three more efficiency than an electric water heater would.


Understanding your heat pump

Heat pumps operate via the principle of heat transference. When in heating mode, a heat pump extracts heat from the outside air and moves it into your home. While in cooling mode, the heat pump removes heat from the air inside your home to the outside leaving cooler air behind. Only a small amount of energy in the form of electricity or gas is required to transfer the heat from indoors to outdoors or vice versa.

When the air outside is too cold for extracting heat, the system’s “backup heat” will come on using an alternate form of heat, usually heated coils knows as “strip heat” or “aux heat” to warm the air inside. This backup heat, however, is powered by electricity or gas which consumes a lot more energy to run.


How does a heat pump work?

Heat pumps provide heating and cooling to your home by moving heat around and by employing a reversing valve, which changes the directional flow of the refrigerant depending on whether cooling or heating is required. Heat pumps are similar to split central air conditioning systems in that they have both an indoor and outdoor unit. They also share some of the same major components, which are:

  • Compressor:The compressor compresses and circulates the refrigerant which absorbs and releases heat as it travels between the indoor and outdoor units.
  • Condenser & Evaporator Coils: The condenser and evaporator coils work with the compressor to heat or cool the air, depending on which mode the heat pump is in.
  • Air Handler:The air handler blows the warmed or cooled air into the ducts of the home to distribute the cooled or warmed air.
  • Heat Strips:Heat strips are an electric heating element used for auxiliary (back-up) heat when the weather outside is too cold for heat extraction and an additional heat source is needed.
  • Reversing Valves:Unique to heat pumps, reversing valves change the directional flow of the refrigerant to either heat or cool the interior of your home.

Unlike central air conditioning systems, though, heat pumps are much more efficient at heating your home in the winter because it removes heat from outside air and pumps it indoors, whereas a central AC system must use a great deal more energy in the form of gas or electricity to create heat in your home and raising the amount of your utility bill.


How does a heat pump cool?

Heat pumps can cool your home just as effectively as energy efficient air conditioners can. Warm air is pulled out of your home by a fan while refrigerant is pumped from the exterior condenser coil to the evaporator coil indoors absorbing the heat from the air. The air handler then pushes the cooled air through the ducts into various rooms of your home. This cycle starts again and continues on a repeating loop until the desired interior temperature is reached.


Can a heat pump dehumidify?

Heat pumps are great dehumidifiers due to their typically larger condenser coils which work better at treating and eliminating moisture from the air than regular air conditioners. After the liquid refrigerant is evaporated and turned into a gas, it is then compressed by the condenser unit and turned back into a liquid, releasing heat into the surrounding air as it does so. As the heat cools, the moisture in the air is removed by the condenser coil thereby lowering the humidity levels. Reduced humidity in the air will immediately make you feel a few degrees cooler than it actually is, providing additional energy and money saving benefits.


Advantages/disadvantages of a heat pump

There are a lot of advantages of having a heat pump in your home, not the least of which you can use it all year round as it provides both heating and cooling. Also, as the primary function of a heat pump is to transfer heat from one place to another, it’s a very economical and efficient way to make your living space comfortable.

There are some disadvantages to heat pumps, though. For example, they are not as effective in extremely cold climates where the temperature falls below freezing on a regular basis. There is more heat to transfer from one place to another in more moderate climates than in very cold climates, so if the auxiliary or backup heating system comes on frequently, then it’s not really operating as an energy-efficient system. Also, in colder climates there is still heat available in the outside air which can be pumped indoors, but the heat pump will need to work a lot harder to extract it.

Another possible disadvantage is that the heat produced by a heat pump isn’t quite as hot and intense as the heat produced by gas furnaces or electric HVAC systems. However, as heat pumps move heat around, heated air is more evenly distributed throughout your home with fewer “cold spots” that homes with traditional heating systems can often have.

The biggest advantage to using a heat pump, though, is that is the heat in the outside air, which is free(!), for heating and cooling making it much more efficient than other systems that use inefficient sources of energy such as oil or electricity. Though the upfront costs of purchasing and installing a heat pump may be higher than traditional HVAC systems, the payoff will be more than worth it as you’ll see reduced energy use and lower utility bills over the heat pump’s life span.


Types of heat pumps

There are three types of heat pump systems: air source, which is the most popular, geo-thermal, and absorption. The difference between them is where they get their heat source from.

  • Air-source heat pump: The air-source heat pump uses fans to transfer heat from the air outside to inside your home and vice versa. Since heat is being moved around instead of generated, relatively little energy is consumed in operating this type of system. Compared to electric or gas-operated heating systems, an air-source heat pump can reduce your utility bill by as much as 50% over these other systems.
  • Geothermal heat pump: Also known as a ground-source or water-source heat pump, the geothermal heat pump transfers heat from underground or a nearby water source. The earth is an excellent source of heat as it absorbs a large amount of solar energy, allowing it to maintain a moderate temperature just below the surface all year round. Geothermal heat pumps use refrigerant or water in pipes submerged underground to absorb the earth’s heat where it is extracted and then sent as warm air into your home. Very efficient, long-lasting, and environmentally friendly, geothermal heat pumps can provide heating and cooling for your home while reducing your utility bill by up to 65%.
  • Absorption heat pump: The absorption heat pump is an air-source heat pump that uses a variety of heat sources, such as natural gas, solar energy, geothermal energy, etc.) instead of electricity to operate the compression cycle for heating or cooling your home. Also, an environmentally-friendly ammonia plus water solution is used to generate heat instead of an ozone-destroying refrigerant.


Clear list of steps to operate the heat pump

Since heat pumps don’t generate heat from scratch, but instead use available natural sources of heat and move it around, there are some factors users should keep in mind when operating their heat pump system.

  1. Don’t set the temperature too high in the winter or too low in the summer. Heat pumps generate a more continuous moderate temperature to eventual reach the desired warm or cool temperature rather than higher- or lower-temperature blasts of air. Therefore, the air coming into the home may not seem warm enough, or cool enough, at first, but heat pumps run in longer cycles to achieve the desired temperature.
  2. If you want to raise the temperature in your home, do so gradually by adjusting the thermostat only 1-2 degrees higher at a time. Doing so will keep your system from employing the auxiliary heat which uses more energy and could affect your utility bill.
  3. Don’t do setbacks with your heat pump. Traditional HVAC users have been taught to “setback” their air conditioner and heater to a much lower or higher temperature when they are out of the house to save on their electric bill. However, doing this with a heat pump system may not only trigger the back-up heat to kick on, but it may also take the system several hours to reach your home’s ideal temperature. It’s best to just set your ideal temperature and then walk away to reap the most benefit in cost savings and comfort from your heat pump.

Also, it goes without saying that just with any HVAC system, proper maintenance is important to maintain efficient operation of your heat pump. Make sure to clean or replace filters on a regular basis (usually monthly), make sure there is no debris, vegetation, or clutter around the exterior unit, check ducts, coils, and registers regularly and clean when needed, and check for refrigerant leaks.


How much does a heat pump cost?

The typical range for installing a new heat pump is between $4,000 and $7,000, depending on the type of heat pump you purchase and the size of your home. Geothermal heat pumps are generally more expensive to install since there are component that require being placed underground. As a heat pump can provide both heating and cooling, it eliminates the need for a furnace and an air conditioner. Though upfront costs may be high, heat pump systems can significantly reduce your energy consumption and keep more money in your pocket making it a worthwhile investment for your home and your budget.

When you’re ready to purchase a new system, be sure to save thousands by shopping online with Pricefixer.com!

Understanding Your Home’s Basic Thermostat

Often overlooked or unnoticed, the thermostat is one of most important and commonly utilized devices today. Regulating the temperature in homes, offices, and commercial buildings all over the world, this small apparatus has a very big job. Thermostats come in a variety of shapes and sizes with a variety of functions ranging from basic to “smart.” Here we will take a look at the basic thermostat and how it works to regulate air temperature.


Definition of basic thermostat

A basic thermostat is a device that functions to establish and regulate a desired temperature. It does this by turning off the air conditioning or heating system when the desired temperature is reached. When the temperature falls below or rises above the desired level, sensors in the thermostat detect this change and will turn the system on until the desired temperature is achieved. The primary function of a thermostat is to maintain the temperature, unlike a thermometer, which measures the temperature.

Your comfort and quality of life often go hand in hand with the ability to heat and cool your home to your desired temperature. But, heating and cooling your home uses a large amount of energy resulting in significant expenses month to month; and it’s the small, unassuming thermostat that regulates and controls one of the most important pieces of equipment in your home. This is why it’s important you not only understand how to properly operate your thermostat, but also how to utilize in a manner that is the most energy efficient.


Brief history of the thermostat

In the 1830s, Andrew Ure invented the bi-metallic thermostat, which employs metal strips that expand when the temperature would increase and cut off the energy supply. In 1885, Albert Butz invented the “damper flapper,” an early prototype of the modern thermostat. His device used a spring motor and crank arm to automatically control the lifting and closing of the damper, which usually needed to numerous times a day by homeowners in an effort to regulate the heat. Butz patented his invention and formed a business which was eventually purchased by, a young engineer named Mark Honeywell. In 1953, the Honeywell company unveiled their iconic, round thermostat, one of the most recognizable thermostat designs in the world and which is still in production today.


Understanding your basic thermostat

A basic thermostat, also known as a “manual” or “non-programmable” thermostat, operates as its name implies: you have to manually turn the dial or move a lever to your desired temperature. There are some basic thermostats that are digitized, where you can just push a button to adjust the temperature to a specific number, but you still have to manually walk up to it to perform this task.

Basic thermostats operate a simple mechanical principle whereby two strips of different metals, usually brass and steel, are welded together and formed into a coil. When exposed to high temperatures, the bimetal strip will expand and uncoil. When the temperature cools down, the bimetallic strip will contract and the coil will tighten. The expansion and contraction of the coil activates contacts on either side of the metal turning the HVAC system on.


How does mercury in a thermostat work?

Mercury is a heavy, silvery-colored liquid metal that moves like water. Within a thermostat, mercury is contained in a vial that tips either to the right or the left based on the expansion or contraction of the bimetallic coil, depending on whether you’ve adjusted the lever on the thermostat to raise or lower the temperature. Wires within the vial allow a current of energy to run through the mercury activating a relay switch that starts your system’s heater or air conditioner. When the temperature or your home starts to heat up (or cool down), a coiled wire gradually unwinds tilting the vial of mercury so that the current is broken and the HVAC system is turned off.

Not sure if your thermostat has mercury or not? Take off the cover of your thermostat and look inside. If you see a glass vial or ampoule containing a silvery-white liquid, then your thermostat has mercury. You can also check the packaging of any new thermostats you buy for “Hg,” which is the symbol for mercury. If you see this, then mercury is in the thermostat.

It is illegal in many cities to dispose of mercury thermostats in the trash. Therefore, it’s important to locate heating and cooling suppliers, or household waste facilities, which will properly dispose of the mercury for you.


Adjusting the basic thermostat

Changing the temperature on a basic thermostat is as easy as pushing a button, moving a lever, or turning a dial. Once you’ve set the thermostat to your desired temperature, your air conditioning system will respond accordingly.


How frequently should my heating and cooling cycle on/off?

A properly working heating and air conditioning system will automatically cycle on and off when the thermostat senses the air is too cold or too warm. Cycling off gives the temperature in your home a chance to regulate as well as saves energy and utility costs. There is no predetermined number of times a system will cycle on and off each hour, nor how long each cycle will run for. Rather, a cooling cycle will last until the air is cooled (or warmed) to the temperature you set on your thermostat. Once the thermostat senses the desired temperature has been reached, it will shut off the system. If the weather is mild outside, your air conditioner will likely run for only a few minutes at a time. During hotter temperatures, it will likely need to run longer to cool the air in your home to your desired setting.

There are other factors which affect how often your system will cycle on and off, such as the size, or tonnage, of your unit, the amount of moisture in the air that needs to be removed, and the temperature of the weather outside.


Diagnosing problems – why is the basic thermostat not working? Troubleshooting.

If you suspect your thermostat is not working properly, there are a few things you check before calling a professional for repairs.

  • Remove the thermostat cover and make sure the inside is clean and free of dust, dirt, and residue
  • Check to see if the thermostat box is centered and level, as being askew can affect its internal components.
  • Make sure your thermostat is not exposed to external heat sources or is located in an area that gets direct sunlight.
  • If you have a digital thermostat, check the batteries to see if they need to be replaced.


How do you calibrate a basic thermostat?

If you suspect the setting on your thermostat does not match the temperature of your home, a simple calibration can determine if your thermostat is working properly or not. To calibrate your thermostat, do the following:

  1. Tape a regular glass thermometer to the wall a few inches away from where the thermostat is located. Place some folded paper towels behind it’s not directly touching the wall.
  2. Wait for 15-20 minutes for the mercury to stabilize.
  3. Compare the reading on the thermometer with that on the dial of the thermostat.
  4. If it’s off by more than one degree, remove the thermostat cover and make sure the inside is clean. Gently remove any dust or debris from coils and/or contact points.
  5. If there is a vial of mercury within the thermostat, use a level to make sure it’s not askew. If it is, loosen the screws and adjust the thermostat until it is level.
  6. After cleaning the thermostat and checking that it’s level, repeat steps 1-5. If still not calibrated properly, then the thermostat should be replaced.

It’s important to make sure your thermostat is calibrated properly, otherwise the result could be a utility increase of up to 10%.


What is CPH?

The cycle rate, or “cycle per hour” (CPH) rate, refers to the number of times per hour your HVAC system will turn on and off. Though there are several variables which affect the CPH, it’s typical for a system to cycle on and off 3-6 times an hour. If your system’s CPH is significantly higher or lower, then you should call an HVAC technician right away.


Clear list of steps to operate the basic t-stat

With a basic thermostat, either the ubiquitous round model or the rectangular version, there will be “System” switch with the options setting the system to Heat, Cool, or Off. There may also be a “Fan” switch with the options of Auto or On available. If set to “Auto,” the fan operates when the HVAC system is running. If set to “On,” the fan will run continuously.

To set the thermostat to a desired temperature, just turn the dial or move the lever to a numbered setting listed. For a basic digital thermostat, just punch in a number or hit the up or down arrow buttons to increase or lower the temperature.


Digital and non-digital basic t-stats

Digital thermostats allow for more precise temperature control that moving a lever or dial on a manual thermostat. Just punch in the exact temperature desired, the thermostat will work to maintain it.


The cost of a basic thermostat

Basic, manual thermostats are fairly inexpensive and easy to fix or replace if they stop working. However, if you forget to adjust your thermostat at night or when you’re away from home for long periods of time, then that wasted energy will certainly affect your wallet.


Where a basic thermostat should be located in the home

The thermostat should be located in a place that’s not only convenient for you to easily access it for programming, but also in the part of the home where you and your family spend most of their time. Ideally placed about five feet off the ground, the thermostat should not be located near an outside wall or exposed to any heat sources, such as direct sunlight, heater vents, skylights, windows, or hot-water pipes.

Basic thermostats are inexpensive and easy to use. Many homeowners prefer them to the more complicated programmable or smart thermostats. However, as newer thermostats allow for more precise temperature control and efficiency options saving you money on your utility bill, it may be time to upgrade your basic one.

What is a Ductless System- Heating and Cooling Systems Explained

What Is a Ductless System?

A ductless air conditioning system is an energy-efficient system that can cool (or heat) rooms and zones of a home without needing ductwork. Ductless systems provide a suitable AC option for homes that don’t have the space for ducts or for homeowners who’d rather not tear up their walls to install ducts.


How Ductless Systems Operate

Similar to ducted, split central air conditioners, ductless systems also consist of an indoor air handling component and an outdoor component housing the compressor and condenser unit. However, instead of just one large air handler unit tucked away inside a closet, crawl space, or attic, ductless systems have multiple air handlers installed in different rooms of the house mounted on the wall. These individual air handlers operate similar to a window unit, where each one can be regulated to a different temperature.

The indoor and outdoor components are linked with copper tubing that passes through a small hole in the wall. Similar to split air conditioners, refrigerant travels through tubing to the indoor air handler(s), where the evaporator coil pulls the heat from the air leaving cool air which is blown into the room. The refrigerant, in vapor form, is then transferred to the condenser coil in the outside unit where it is changed back into liquid form.

Ductless systems were originally developed by a Japanese manufacturer in the 1970s and are predominantly used in Asia and Europe, but they have recently gained in popularity in the U.S. due to their energy-efficient capabilities. The ductless air conditioner was designed to be an improved version of the window unit, where it could provide localized cooling to homes and buildings where a larger, central air-type system was not an option due to building size or financial constraints. Providing greater efficiency than window units, the ductless system offers air comfort variability that can be controlled individually, room-by-room, which enhances its appeal as it gives all family members more control over their own comfort.


Pros and Cons of a Ductless Unit

Pros

  • Ductless systems are very energy efficient due to the fact that they’re smaller so they use less energy to operate and because there are no ducts. An average home with a central air conditioning system can have an energy loss of 25% to 30% just from their ductwork. Ductless systems also have technologically advanced components such as an inverter-driven compressor, which allows the system to speed up and slow down as needed instead of shutting down completely. Other types of systems consume a lot of energy just on start-up alone.
  • Installation of ductless systems is easier and less complicated than ducted systems. The factory puts together most of the components of a ductless and not having to deal with ducts makes the installation process one where there are fewer chances for mistakes to occur.
  • Faster cooling – since there are no ducts for the air to travel through to reach its destination, ductless systems can cool a room much quicker since the air handler unit is already in the room.
  • Zoned cooling -each indoor unit of a ductless system has its own thermostat allowing that room’s temperature to be individually controlled. No need to cool a room that’s empty – just turn the unit in that room off. Plus, family members get to choose the temperature that is most comfortable to them.
  • Reliability – ductless systems have gained a reputation for being reliable and maintenance friendly. Also, without ducts, potential problems such as leaks, debris, or build-up which can clog air flow and reduce efficiency are not a concern.

Cons

  • Ductless systems are expensive. For a single-room installation, a ductless air conditioner will cost you several times more than a standard, comparable window unit. Compared to an air conditioning system for an entire home, such as a ducted central air conditioner, a ductless system will typically be more expensive than a similar capacity unit. And, if you are replacing your ducted central air system with a ductless system, the cost could be two to three times more expensive than replacing it with another ducted system.
  • Maintaining a ductless system can be cumbersome as each unit’s filter will need to be washed monthly, or more frequently if there are pets or a smoker in the house. Skipping this important step could shorten the life of your system.
  • Ductless systems are primarily used for spot-cooling rooms in an average-sized house and are not really ideal or cost-effective for cooling an entire building.
  • The indoor component of a ductless system may not be aesthetically pleasing to some, and they typically come in only standard white or beige colors, jut out from the wall, and cannot be covered.

Ductless System Set-Up

The outdoor component of a ductless air conditioning system can be installed on a concrete slab in a shaded area on the side or back of the house and unobstructed from shrubbery. The exterior unit can also be attached to the outside wall of the house with mounting brackets. With this type of installation, it’s important to have plenty of clearance, at least 4 inches, between the wall and the unit, and at least 20 inches of clearance above the unit.

Interior components of a ductless system are typically mounted high on an interior wall of the room it’s cooling. It should be centrally located in the room for even distribution of the cooled air. For less obtrusive locations inside a room, ductless interior units can also be placed recessed in the ceiling or near the floor. The indoor unit should be installed no more than 50 feet away from the outdoor unit.


Cost of Operating and Maintaining a Ductless System

The upfront cost of your ductless system will depend on the size of your home and how many units it will require –  either one, two, or perhaps four or more. The more units required, the more the initial cost will be. There are also other factors which can affect the cost of a ductless system such as brand, the amount of cooling needed, system features and capabilities, integrated technology, and air conditioning support and services.

The high costs of ductless air conditioners can sometimes scare consumers away, but rebates and tax incentives are often available as they are energy-efficient systems. Plus, the initial costs are likely to be recouped before too long since ductless air conditioners, which have SEER ratings up to 26, are one of the most efficient and cost-saving air conditioning systems available. Ductless air conditioners use up to 30% – 50% less energy than central air systems so their overall operational costs are lower. Maintenance costs for ductless systems also tend to be lower than that for other systems, and with proper care and maintenance a ductless system should last for over 20 years.


Is a Ductless Air Conditioning System the Best Choice for Your Climate?

Ductless systems are a great option for most climates as they can provide individual heating and cooling effectively and efficiently. However, for those regions that reach extremely high temperatures and humidity levels in the summer, a ductless air conditioner may have difficulty cooling your home on some of those hotter days. Also, ductless systems are not as good as central air systems at removing moisture from the air so for those who live in a very humid climate, a ducted system may be a better option.


What Is the Difference Between a Ductless System and Other Types of Systems?

Ductless air conditioners resemble window units in that each are designed to cool one room. The similarity pretty much ends there as ductless systems are much more efficient than window units, don’t block the sunlight by taking up space in a window, and don’t pose a security risk as window units can easily be removed. Window units are still the cheapest and easiest air conditioners to install, though.

Compared to ducted air conditioning systems, such as split and packaged AC units, ductless systems work in a similar way to cool the home with the use of a compressor, evaporator coil, condensing coil, refrigerant, and blower. However, the cool air is delivered directly into each room through separate air handler units installed on the walls of each room instead of the cooled air reaching the room through a network of ducts. Not having ducts makes for much easier installation and maintenance for ductless systems, as well as improved efficiency and less dust in the air as there are no ducts on which it can collect.

Ductless systems come with a hand-held remote that controls just that one individual unit. With the remote, you can turn the AC system off and on, choose heat or cool, set the thermostat, and control the air speed. If you have multiple units in your home, then a programmable thermostat will allow you to pre-program your desired temperature settings and start/end times for all of the connected units.

Naturally, with the internet of things (IOT), there are smart thermostats available for ductless systems as well that can preheat or precool your home before you get home, monitor the temperature of your home, even while you’re away, adjust the temperature according to weather systems, and work with other applications for multiple features and benefits.

Ductless air conditioning systems are a great alternative to the ducted options and with their temperature variability control and energy-efficiency, they are an excellent choice for many consumers. However, your AC contractor may still advise you to get a ducted system if you already have ducts installed, are concerned with controlling the humidity, or want better air flow throughout your home, which a network of ducts help provide.

If you’re in a new house without any ducts already installed, then you will have the choice of which type of air conditioning will work best for you and your home. To learn more about the most common types of systems, click here. If you’re ready to shop for your new system and want to save thousands by shopping online, click here.

What is a Split System – Heating and Cooling Systems Explained

What Is a Split System?

The most common type of central air conditioning system used in the U.S. is the “split” type of system. It’s called a “split” system because it’s comprised of two main components, one located inside the home and one located outside the home. The interior component, also known as the air handler, has a blower and evaporator coil to distribute cool air through the ducts of the home, and the outside unit houses a compressor and condensing coil which pumps refrigerant into the system.

A split air condition system uses electricity as it power source and utilizes the ducts in a home to distribute cool air and warm air when needed. Using the same network of ducts for both heating and cooling makes the split system one of the most efficient types of air conditioning systems available.

To learn more about other types of systems, click here. 

You can also watch this system explainer video which contains a condensed overview:


How a Split Air Conditioning System Operates

The compressor, which is housed in the outdoor metal cabinet, is a motorized unit that pumps a liquid coolant through pipes (also known as “refrigerant lines”) to the interior unit, where it then removes heat and moisture from the home. It does this through a process called phase conversion, where warm air blows over the evaporator coil causing the liquid refrigerant to change from a liquid state to a gaseous state (vapor). When a substance changes from a liquid to a gas, a unique result is the removal of heat from the air. Within the air handler, the cooler air is then blown through the vents into the home while the vapor is transferred back to the outside air conditioning unit where the condenser coil changes it back to a liquid and the process begins all over again.

Air conditioning has come a long way since a young engineer named Willis Carrier invented the first air modern air conditioning unit in 1902. While working for a printing press, Carrier was asked to solve the humidity problem in the plant, which was causing the pages of the magazines wrinkle and curl up at the edges. The system he designed controlled the humidity by sending air over water-cooled coils. Recognizing the usefulness of his invention, he went on to form his own company which focused on developing and improving the air conditioning system.

Today, air conditioning is considered an essential part of modern living allowing us to remain cool in our homes, places of work, restaurants, schools, hospitals, etc. Air conditioning has become an important and integral part of our everyday lives. In fact, Americans consume more energy each year running air conditioners than the rest of the world combined. According to the U.S. Department of Energy, nearly 6% of all the electricity produced in the United States is used by air conditioners, costing homeowners almost $30 billion in annual costs and producing nearly 117 million metric tons of carbon dioxide in the air each year.

This is why energy standards have been adapted for manufacturers to produce more energy-efficient appliances and air conditioning units. The air conditioners manufactured today are 50% more efficient than those produced just ten years ago, saving consumers millions of dollars and reducing the amount of harmful pollutants being released into the environment.

Split air conditioning systems are one of the most energy efficient systems you can find. With SEER (Seasonal Energy Efficiency Ratio) values ranging in the high 20s, split systems are a great choice for the environmentally and budget-conscious consumer.

The Air Conditioning, Heating and Refrigeration Institute also has a number of resources to help homeowners understand their systems here. 


Split Air Conditioning Installation

The most important aspect of the split AC system is the installation. If it’s done properly, your system will perform at its optimum level, but if it is not installed properly, then the result could be higher utility bills, frequent maintenance problems, and uneven cooling. Before installing the two parts of a split air conditioning system, first it must be determined where the inside component should be located. Typically, the indoor unit is placed in a closet or cabinet, but if neither of those is available, then another space must be used.


Attic Installation

Some interior units of a split system are housed in the attic. There are many contractors, however, who believe installing the air handler in the attic is not the best idea as attics are typically not air conditioned and, therefore, get very hot in the summer. This can affect the efficiency of the indoor unit. Ducts expand and contract with temperature changes and an area with unregulated temperature, such as the attic, could cause leaks and loosening of the duct seals. Additionally, with the indoor unit housed in the attic, one may forget about it and not perform regularly required maintenance, or may not want to if the unit is hard to get to. In older homes where space is limited, there may be no other option than the attic for the location of the indoor unit. In this case, it’s important that the ductwork be properly sealed and insulated and the installation is done by an AC professional.


Garage Installation

The garage is a location many people think is ideal for installing the air handler as there is usually plenty of space, it’s not as hot as the attic, and there’s enough room to easily access the unit for repairs. However, there is a case to be made that the garage is probably the worst place for the air handler. Many people use their garages to store items such as pesticides, lawn mowers, paint, and their automobiles that often have the engine running before the garage door opens or closes. This can cause garages to have high levels of carbon monoxide and various other pollutants that contaminate the air, which could be getting sucked into your home through leaks or gaps in the air handler. Poor indoor air quality is a health concern and may result in serious health issues. If the garage is the only place available for your air handler, then it is recommended that it is placed in an insulated and air-sealed closet to reduce contaminants from entering the system. Other actions you should take would be to make sure the duct system is properly sealed and purchase a carbon monoxide monitor for the inside of your home.


Crawl Space Installation

Installing the air handler in a crawl space is a popular option as it keeps the unit “out of the way.” However, many crawl spaces are damp and dark and can get hot and humid during the warmer months. Therefore, it’s important to make sure your crawl space in encapsulated and not vented to the outside as this could cause mold growth and reduce air quality, especially if you live in a more humid climate. Installing a dehumidifier in the crawl space is beneficial as well.


Basement Installation

Basements are also a place where air handlers can be installed as it offers an “out of sight” location like attics and crawl spaces, although the basement allows for easier access to the unit.


How Much Does a Split System Cost?

There are several factors which will affect the cost of an AC unit, but the usual range for installing a new split air conditioning system is between $3,700 and $7,200. The size of your home, whether or not ducts need to be installed, repaired, or replaced, and installation rates are the top determining factors affecting the cost of your new AC system. Also, it’s important to make sure you purchase the right-sized air conditioner for your home. This is where a professional AC contractor is key helping you determine the best AC fit for your needs.

First, the contractor will determine how much cooling power your home will need by performing a load calculation. This measurement takes in account a variety of factors affecting the temperature of your home such as square footage, number and types of windows, how much heat loss your home experiences, insulation levels, whether or not your home is located in the shade, etc. This data is then analyzed to determine how much air your air conditioning system is likely to lose and which system is the best one for efficiently cooling your home.

The climate in which you live is also an important factor that will determine the type of AC unit that will be best for your home. If you live in a hot, humid climate, you will want an air conditioning system that effectively cools and dehumidifies your home. You will also likely want a unit with a higher SEER rating for energy savings as an air conditioner in a state like Florida is going to work a lot harder in the summer than one in a state such as Minnesota. If you live in a drier or milder climate, then a lower-rated SEER model should suffice.

It’s important to make sure your HVAC equipment is sized properly for your home as a system that is too small won’t effectively cool the air, and one that is too large won’t properly remove all the humidity in the air, cause uneven cooling, and increased utility bills.

The SEER number you choose for your split system will also affect the price. Higher-rates SEER units will save you more money each month, but the upfront costs are more expensive than lower SEER models. To learn more about SEER, click here. To find out about SEER minimums where you live view this Seer Mimimums Map.


Pros and Cons of Split Air Conditioning Systems

Cons:

  • Split systems are large and bulky with a unit located not only outdoors, but indoors as well. A significant amount of space is needed to house the large, unattractive metal cabinet of the indoor air handling unit and some smaller houses don’t have a lot of space to give up to begin with.
  • Ductwork needs to be installed if not already present and this can be costly. Also, if ductwork is present and was installed years ago, it will likely need to be cleaned, repaired, or even replaced if it is not a good fit for the new air conditioner.
  • Installation is more complicated and tricky with an indoor component, outdoor component, and lengthy network of ducts. There’s more opportunity for something to go wrong or mistakes to occur.
  • The indoor air handling unit may be housed in an area that is difficult to get to and repair.
  • Higher repair costs – with more parts, there’s more that can go wrong.


Pros:

  • A consistent temperature is easily maintained and distributed throughout the home with central air conditioning.
  • The AC components are hidden away behind walls, in out-of-the-way-places, or outside.
  • Split systems have more availability of higher SEER rated options for saving even more money and energy than standard models. The U.S. Department of Energy has mandated that a minimum SEER rating of 15 will go into effect for southern states in 2023 (SEER 14 for northern states), but many manufacturers are already producing split system units with SEER ratings as high as 28.
  • Split air conditioning systems are better at removing humidity and cooling larger spaces.


What Is the Difference Between a Split System and a Ductless System?

A ductless air conditioning system is also split into two parts with an indoor and outdoor component, just like the split central air conditioning system, however, a ductless system does not require ducts. Ductless systems are a great option for those homeowners who don’t have a network of ducts already installed in their home, don’t want to tear up their walls installing ducts, or just don’t have the room for them.

Besides no ducts, this type of system differs from split systems in that instead of one air handler in the home, there are multiple “mini” air handlers which are installed in every room, usually high up on the wall. This type of installation allows for the temperature of each room to be individually controlled by the thermostat on the air handler unit. Therefore, if one person prefers a room temperature of 78 while another prefers their room temperature to be 72, then this system offers that type of temperature control variability.


Air Filters & Maintaining Your Split Air Conditioning System

Once you’ve installed your new central AC system, it’s important to perform regular maintenance, service, and repair to extend its life and make sure it operates at maximum efficiency. One of the most important ways to take care of your air conditioner is to replace the filters regularly. The large amount of air traveling through your AC system contains dust, debris, allergens, and pollutants, which is cleaned when pulled through the air filter. If the filter gets dirty and clogged, then the air cannot be cleaned as effectively and air flow is reduced. Clean filters equal clean air, dirty filters… less so. It’s best to check your air filters at least every two weeks and replace them as soon as they look dirty.


SEER Options You Should Definitely Check Out and Energy Efficiency Standards from the Government

It’s easy to take your air conditioner for granted. You likely never give it a moment’s thought as it hums quietly in the background cooling your home to the perfect temperature on those sweltering hot days… until suddenly it doesn’t. Next thing you know you’re on the phone with an AC company who asks you what type of system you have, and all you know is it’s an “air conditioner” – you have no idea what kind of unit it is. Well, if you’re in the market for replacing your old air conditioner, then it’s time to educate yourself about an important component of your home that’s integral to your comfort, well-being and wallet.

Let’s cover the basic parts of a central air conditioning system, how it functions to cool the air, the ever-important SEER energy rating every new AC unit has, and how to find the perfect AC system for your home.

Central air conditioning systems come in three types: split systems, packaged units and ductless systems. Let’s just look at split and packaged for now. Split systems have two separate parts; one part located outside the home that contains the condensing unit and compressor, and one part located inside the home containing an evaporator coil. A packaged unit has the condenser, compressor and evaporator coil located in one single unit that typically sits outside the home on the roof or on a slab next to the foundation.


Split System vs Packaged Unit

Split and packaged systems both work the same way, however, there are some differences. For example, split systems are much larger than packaged units, are typically cheaper to repair and maintain, and come with higher energy-efficiency SEER ratings. Packaged units are typically cheaper to install because there’s just one piece, but exposure to the outside elements could cause damage or a shortened life span, and they have lower energy-efficiency SEER ratings.


Split System:

Split System

  • Much larger than packaged units
  • Typically cheaper to repair and maintain
  • Available in higher SEER-rated models


Packaged System:

Package Unit

  • Cheaper to install
  • Exposure to the outside elements could cause damage
  • Lower energy-efficiency SEER ratings


The deciding factor as to whether a split system or a package unit is the best one for you is largely dependent on the layout and size of your home. A good rule of thumb, though, is to stay consistent with what you already have and replace a split system with a split system and a packaged unit with a packaged unit, especially if you have been generally satisfied with the level of comfort your system provides.

To discover more about the different types of systems, click here to watch a video explainer designed just for you.


How Air Conditioners Work

Air conditioners use refrigerants to cool indoor air by drawing the warm air out of your home through ducts, and supplying cool air through the registers and vents in the ceilings or floors. Besides cooling the indoor air, air conditioners also regulate the ambient temperature of the home via a thermostat. Additionally, they act as dehumidifiers, because reducing the temperature of humid air reduces its moisture content, and air filtration systems as they remove airborne particles from the circulating air through the use of filters. That’s quite a lot going on for one air conditioner!

What’s even more impressive is how the components of an air conditioner, the coils, condenser, compressor, fans, and blower, replicate the physical law of when a liquid converts to a gas, it absorbs heat (known as phase conversion) in order to generate cooling. Warm air moves over refrigerant-filled coils, causing the refrigerant to evaporate from a liquid to a gaseous state – absorbing heat as it does so – and then it is compressed and condensed back into a liquid state for the process to begin all over again. The chilled air is then circulated throughout your house by blowers located in the air handling unit.

Some useful terms are included on the Cooling Cheat Sheet below.

Cooling "Cheat Sheet"


New Air Conditioning Systems Can Save You Money

Air conditioners certainly have come a long way since the first system was developed by Willis Carrier in 1902. The device he created blew air across chilled pipes to lower the temperature and humidity levels. Today’s air conditioning systems effectively and efficiently cool your home by using state-of-the-art equipment that uses a lot less energy than the models produced just a few years ago do.

In fact, there’s a good number of energy-efficient AC models to choose from now, ranging from 13 SEER all the way to 26 SEER, with higher-rated models being manufactured every year. SEER stands for Seasonal Energy Efficiency Ratio and indicates the energy-efficiency of a particular air conditioning system. The higher the SEER rating, the more energy-efficient it is, which means increased savings on your utility bill over the life of the air conditioner. Although more expensive than base models, you can usually recoup the extra cost of purchasing a high SEER unit over several years by the lower monthly utility bills you’ll receive. Most commonly, people gravitate toward the 14-18 SEER range when purchasing equipment for their home.

If your current air conditioner has been around awhile and showing signs of needing repair, such as not cooling your home like it should on hot, summer days, skyrocketing utility bills, or clanking, banging, or rattling sounds, then it’s probably time to start shopping for a replacement. The good news is that depending on the SEER rating of your current system, newer SEER models can save you a lot of money on your energy bill! If your current air conditioner is pretty ancient, then it could be an 8 SEER. Replacing it with a 16 SEER unit would save you nearly 50% on energy costs and significantly reduce your utility bill.

Saving money with your SEER rating


How to Find Your AC Unit’s SEER Rating

To find out the SEER rating of your current split system unit, look for the yellow and black tag stuck to the side of the condenser. You will see the words “Seasonal Energy Efficiency Ratio” and the number underneath is the SEER number. If you can’t find it there, look for a performance information sheet stuck to the front of the air handler on the indoor part of the unit. Most packaged units have the SEER rating listed on the black and yellow “hang tag” located on the outside of the unit. If you’ve looked everywhere and still can’t find your SEER rating, then the Air Conditioning, Heating and Refrigeration Institute has a handy directory look up on their website here, where you can put in the make and model of your AC system to find the SEER rating.

Now that you know your current system’s SEER number, you can calculate how much more energy efficient your new air conditioner will be. Chances are, your old unit has a SEER rating that is no longer made or allowed to be made by law. In 2015, the Department of Energy (DOE) mandated that all new air conditioners manufactured in the U.S. be a minimum of 13 SEER for northern states and minimum of 14 SEER for southeastern and southwestern states.

Use the link below to see the SEER Minimums map and discover the government requirements for your state.

Seer Mimimums Map


Why Having an Energy Efficient Air Conditioner Is Important

The U.S. Department of Energy implemented energy conservation standards for air conditioners, and other appliances we typically use on a daily basis, to help save consumers billions of dollars each year and to reduce harmful effects on the environment caused by our energy consumption. According to the DOE’s website, three-quarters of all homes in the U.S. have air conditioners which use close to 6% of all the electricity produced in the United States, costing homeowners $29 billion annually. As a result, about 117 million metric tons of carbon dioxide are released into the air each year.

This is a serious concern because carbon dioxide (CO2) is a greenhouse gas that traps heat within the Earth’s atmosphere (for decades, if not centuries!) and contributes more to global warming and climate change than any other green house gas. More and more extreme weather events are being linked to climate change, and the effects of climate change are far-reaching: from rising temperatures causing a shift in precipitation patterns that change the growing patterns of plants threatening wildlife dependent on this source of food, to rising sea levels eroding shorelines and destroying ecosystems, to farms and crops producing lower yields resulting in significant economic losses.

So, limiting CO2 emissions is imperative for protecting the environment and minimizing climate change. Do your part to reduce your carbon footprint by minimizing the amount of energy you waste as much as possible. Switch to energy efficient light bulbs, walk or ride your bike instead of driving a car, take shorter showers, and install an energy-efficient air conditioning system with a high SEER rating.


Questions to Ask Before Purchasing Your New Air Conditioning System

Now that you’ve determined you’re upgrading your current air conditioning system with a more energy-efficient one, and you’ve educated yourself about the different types of central air conditioning systems, there are some important questions you should ask your contractor before your new unit is installed, such as:

  1. What size system do I need to adequately cool my home? Don’t assume the size of the old system is the right size as it may not have been measured properly.
  2. Will the current ductwork suffice? What is the condition of the current ductwork; should the ductwork be cleaned before the new unit is installed?
  3. Are there any rebates, tax credits, or savings incentives for purchasing an energy-efficient system?
  4. What kind of regular maintenance is required? Do you offer a maintenance program?
  5. What type of warranty is there and what does it cover?

With a little bit of AC knowledge and asking the right questions, you will be able to make the best choice in air conditioning systems for your home.

The Top 5 List of SEER Levels You Need to Know

Why SEER Matters

You’ve determined it’s time to replace your air conditioning system and as you begin researching the best new options available, you’re presented with a dizzying array of choices. Terms such as tonnage, SEER, and load capacity are discussed, and you don’t understand any of it, so, you’re just going to trust that the local AC repairman you called is going to sell you the best unit for your home. Hold on…purchasing a new air conditioning system is a huge investment!

Depending on where you live, the lifespan of an AC unit could last 10-15 years. Besides the upfront cost of a new unit and installation, the type of system you purchase will affect your monthly utility bills over the course of that unit’s lifetime. That’s 10 to 15 years’ worth of utility bills coming out of your wallet. The decision to purchase a new AC system is not one to be taken lightly, nor handed over to someone who may not have your best interests at heart.

Doing your due diligence to research the different types of air conditioning units is not only your responsibility as a conscientious consumer, but it’s also not that difficult. Here at Pricefixer.com, we believe in educating consumers, so they can make the best purchasing decisions for their home and their budget. Continue reading to discover the top five SEER rated AC units.

Saving money with your SEER rating


Where to begin

When shopping for a new air conditioner, you’re going to want to pay attention to the SEER number. SEER stands for “Seasonal Energy Efficiency Ratio,” which is a measurement of how energy efficient a particular AC system is.  The higher the SEER, the greater its energy efficiency.  The SEER number is important because it’s not only regulated and monitored by the U.S. Department of Energy, with minimum SEER ratings enforced across the nation, but also because the SEER number affects the cost of the unit. The higher the SEER rating, the more expensive the system. However, the higher the SEER rating, the more energy efficient it is and, therefore, the more money you’ll save on utility bills over the lifespan of the unit. But, is the higher upfront cost really worth it? How much does a 16 SEER save over a 13 SEER or a 22 SEER over an 18 SEER?

In order to determine accurate cost savings across various SEER rated units, we simply need to do a little math. When trying to determine the best SEER rating for your home and budget, you’ll need to divide an AC unit’s rated BTUs by its SEER number to figure out how many watts per hour it consumes. It sounds more complicated than it actually is.

First, let’s get some basic definitions out of the way. BTU stands for “British Thermal Unit” and is used to measure heat energy. One BTU is approximately equal to the energy released by burning one match. As it relates to air conditioning, it’s a measurement of how much heat is removed from the air or, in other words, the “cooling power” of an AC unit. A 1-ton AC unit can remove 12,000 BTUs per hour; a 2-ton unit can remove 24,000 BTUs per hour, 3-ton, 36,000 BTUs per hour.  Kilowatt is a measurement of energy typically used by large appliances to measure how much energy they use.

So, back to our formula:

STEP ONE:

If you’re looking at a 3-ton (36,000 BTUs) AC unit with a 16 SEER rating, divide the number of BTUs by the SEER rating:

36,000 BTUs / 16 = 2,250 watts

Since utility companies bill in increments of 1,000 watts, known as Kilowatt hours (kWh), to get the hourly wattage consumption number from the annual number of hours, we just need to divide 2,400 by 1,000, which equals 2.25 kWh.

36,000 BTUs / 16 = 2,250 (÷1,000) = 2.25 kWh

To determine your annual operating costs with a 16 SEER, you’ll need to know approximately how many hours your AC system is going to operate over the course of a year based on your geographical region. For example, the state of Florida uses an average of 2,800 hours of AC operation a year. Northern states, of course, will have a much lower average.

The next part of the math equation is to take the number of hours of operation and multiply it by the number of kWh consumed per hour (2.25 kWh) to get the annual consumption in Kilowatt hours.

STEP TWO:

2,800 x 2.25 kWh = 6,300 kWh in annual consumption

Now, it’s just a matter of converting these numbers to dollars to get an idea of the annual cost. If you look at your utility bill, you will be able to determine the total cost per kWh. For Florida residents, the average cost is 11.6 cents per kWh, which we’ll put into our formula as .116.

STEP THREE:

6,300 kWh x .116 cents = $730.80

The approximate annual cost of a 3-ton 16 SEER unit in Florida is $730.80.

Applying this same formula to the other SEER ratings results in the following costs:

13 SEER = $896.45

14 SEER = $834.74

15 SEER = $779.52

18 SEER = $649.60

22 SEER = $519.68

These saving look impressive and you may want to run out and purchase a 22 SEER, but, remember, the higher the SEER rating, the more expensive the unit. You will have to determine if the initial upfront cost of a more expensive unit will be worth it for you over its lifetime.

Some things to consider would be, do you plan to stay in your home for the next 10-15 years? What is your budget? Do you prefer to pay more now to save more later each month? Is it important to you to have energy efficient appliances to help benefit the environment?

If you only intend to stay in your current home for five years, then comparing prices of different SEER units with the annual operation costs figured out above can help you determine if it’s worth it to have a higher SEER unit. For example, if the total cost including installation fees of a 13 SEER unit is $4,200 and a 14 SEER unit is $5,000, then that’s a difference of $800. When comparing the annual operational costs of the two SEER numbers calculated above, the 14 SEER unit has an annual savings of $61.71 more than a 13 SEER ($896.45 – $834.74). However, if you plan to only be in your home for five years, then the total savings of having a 14 SEER over a 13 SEER is $308.55, meaning you haven’t even recouped half of the increased cost of the 14 SEER yet. However, after 13 years, the extra cost will be recouped.


Higher SEER Rated Units, Are They Right for You?

The minimum standard SEER number for the northern states is 13 and for southern states is 14. Some SEER ratings, however, go as high as 26. Typically, higher SEER units are the best option for those who live in a climate that is hot and humid for most of the year and cutting energy costs is a priority, or for those who are dedicated to helping the environment by reducing carbon emissions with energy efficient appliances. As technology continues to improve, there will no doubt be more efficient models for consumers to choose from.

In fact, according to the International Energy Conservation Code (IECC), which was adopted by the United States in 2009, a framework of upgrades has been laid out that will continue until 2030 requiring manufacturers and installers to use progressively more efficient units. These changes will drive down costs and reduce environmental damage, which benefits everyone.

Therefore, the minimum SEER value will continue to increase, with the next one likely to go into effect in 2023, where northern states must have a minimum of SEER 14 and southern states a minimum of SEER 15.


The Impact of Standardized SEER Ratings

The mandatory upgrade from a SEER 12 to a SEER 13 that took place in 2006 represented a 30% increase in minimum energy efficiency for air conditioners. What does this mean in terms of reduced energy consumption? According to the DOE, 4.2 quadrillion BTUs will be saved between 2006 and 2030 by using a SEER 13 instead of SEER 12. This equates to the amount of annual energy used by 26 million U.S. households, resulting in savings to the consumer of over $1 billion by 2020! Also, the SEER 13 standard has significantly reduced fossil fuel consumption and limited air pollution. Fewer power plants needed to be built due to a SEER 13 standard, which means nitrous oxides emissions and greenhouse gas emissions were significantly reduces. As the minimum standard SEER rating increases, even more savings to the environment and consumers’ wallets will occur.


History of SEER Ratings – We’ve Come a Long Way, Baby

Before 1980 ———-SEER 6 or less

1980 to 1985 ———SEER 7 or less

1986 to 1991———-SEER 8 or less

1992 to 2005 ———-SEER 10 – SEER 12

2006 to present ——SEER 13 or higher

That’s a lot of energy saved!

How to Determine Your Ideal SEER – 5 Simple Steps That Will Work for You

Think Before You Buy

Breakdown of SEER

The SEER rating on an air conditioning unit is one of the most important factors you should take into account when purchasing a new unit for your home. SEER, which stands for Seasonal Energy Efficiency Ratio, is a number that indicates the maximum energy efficiency of a central air conditioning (AC) unit while it operates over a typical “cooling season.” The higher the SEER rating, the more energy efficient it is, but also the more expensive up front. Yes, a more energy-efficient system will save you money on your monthly utility bills, and a less-than-honest sales person may convince you the savings are well worth it, but there are a few other things you need to consider in determining your ideal SEER number, in addition to that.

First, it will be useful to understand how a SEER rating is calculated. The total amount of energy output (measured in BTUs) used over the cooling season is divided by the total amount of electrical energy input (measured in watts) that is used. In other words, the amount of energy produced to cool a room to a specific indoor temperature is measured against the amount of energy consumed by the AC unit to create this cooling. This measurement is done under a variety of outdoor temperatures ranging from the 60s to the 100s, with variable humidity levels, while maintaining an indoor temperature of 80°F. The resulting average number is what determines the SEER rating.

Every AC system is tested by the manufacturer according to guidelines stipulated by the U.S. Department of Energy. The whole point of performing a test over time like this, with varying temperature conditions, is to try and gauge how much energy an HVAC (Heating, Ventilation and Air Conditioning) unit consumes when used during a typical summer season in the U.S. However, not all climates are similar across the nation, and a 13 SEER in an arid, hot climate may not be as efficient as a 13 SEER in a milder, moderately warm climate. Similarly, an AC unit’s efficiency will fluctuate based on different weather conditions; how efficiently it runs when it’s 101F outside will differ from how efficiently it runs when it’s 85°F outside. The SEER number is not a constant—rather, it’s the maximum amount of energy efficiency an AC unit can achieve, which means a 16 SEER can reach a maximum operational efficiency of 16 but will sometimes operate at a lower efficiency as well, depending on varying weather conditions.

It’s important to remember that the SEER rating is not a constant value but changes often, much like the MPG of your car changes based on how you drive it. Keep this in mind when you come across a SEER energy savings chart, or one of the many SEER savings calculators you’ll find online. These tools use the maximum SEER number to show you how much energy is being saved, as if an AC unit is going to work at its maximum efficiency 100% of the time, which just isn’t accurate. Also, many of these charts and calculators base their savings percentages on an 8 SEER or a 10 SEER, when you may have a 12 SEER. So, if you see a chart with 50% savings listed above a 16 SEER, then that means a 16 SEER is 50% (at the most)more efficient than an 8 SEER only. If you have a 12 SEER and upgrade to a 16 SEER, you’ll see closer to 25% in energy savings, which is still pretty good.


Determining what is best for your home and budget

Higher SEER units cost more than lower SEER units, but perhaps you like the fact that higher SEER units will not only save you money on your utility bills, but will also reduce energy consumption all around, which is good for the environment, and a higher energy efficient model will reduce your own personal carbon footprint. Now you need to determine the best SEER for your home, your budget, and your lifestyle.

In order to do this, you’ll need to ask yourself a few questions:

  • How long do you plan to stay in your home? Higher SEER models will provide better efficiency, but it could take nine, ten, or more years to recoup the initial cost of the unit. If you plan to move within the next five years, a higher SEER may not be worth it.
  • What is the climate like where you live? If you live in a climate where there are several months that you don’t run your AC, then the yearly savings won’t be as great as if you lived in an extremely hot and humid climate where your AC is constantly running. So, if you use your AC only part of the year, it will take longer to recoup the initial investment of a higher SEER model.
  • What’s your budget? Not just for the cost of the unit, but for the projected costs of maintenance and repair as well? Higher SEER units have components that are usually two to three times more expensive than those used in base models, therefore, repairs will be quite a bit more expensive as well.
  • How important is it to you that your appliances are energy efficient in order to benefit the environment? If this is something you value, then a high SEER unit may be right for you.


5 simple steps to determine your ideal SEER

  1. Repair or Replace: First, determine whether you need a replacement, or if your AC unit can just be repaired. The average life span of an HVAC unit is 15 years (eight-ten years in hotter climates), so if your unit is nearing or has passed that mark, then it’s probably time to replace. Other signs your unit may need replacing include frequent repairs, rising utility bills and inadequate cooling of your home during the summer.
  2. Know the Essentials: Educate yourself on the process of buying an AC and get to know the common terms used when talking about them, especially as it relates to cooling. Besides SEER, other terms you should know are:
  • Air Handler: The part of the central air conditioning system that moves the cooled or heated air through the ducts.
  • Load Calculation: Measurements taken within a structure (such as square footage, insulation, ductwork, etc.) to determine its heat loss and gain so a properly sized unit can be installed.
  • Compressor: Located in the outdoor unit, the compressor circulates refrigerant throughout your AC system.
  • Condenser: A component of the outdoor unit that keeps the refrigerant cool.
  • HVACRefers to Heating, Ventilation, and Air Conditioning.
  • EER: Energy Efficiency Rating. A measurement of an AC unit’s energy efficiency under a single set of temperature conditions. The higher the EER, the more efficient it is. Visit our post on SEER to learn more and to read about how SEER and EER differ.
  • Evaporator Coils: Allows for the evaporation of cooling agents from a liquid into a gas, which absorbs heat from the surrounding air in the process.
  • Refrigerant: A chemical used in an air conditioning system that absorbs a lot of heat when it changes from a liquid to a vapor.
  • Tonnage: The cooling capacity of an air conditioner based on a measurement of how much heat an AC unit can remove from a home in one hour. The higher the tonnage, the more cooling capacity a unit has.
    Cooling "Cheat Sheet"
  1. Search Online for Your Model: Look at your current equipment and write down key elements like model number, manufacturer, SEER rating, etc. and perform a Google search on comparable equipment. Read reviews, compare costs, analyze guarantees and research manufacturers to get a better understanding of the investment costs involved and expected energy savings.
  2. System Choice: Is your current system or was your current system operating at a satisfactory level? If you don’t feel your current system is cooling your home adequately during the summer months and your utility bills seem particularly high, then replacing your old unit with a higher SEER unit will save you money and provide better cooling. Even if your unit is a 10 SEER and you upgrade to the minimum-required 13 or 14 (depending on where you live), you will still benefit from significant cost savings.
  3. Review Your Cash Flow: Look at your cash flow – determine whether you want to invest now or spend the money over the lifetime of the equipment. Spending more money upfront on a high SEER unit will result in lower monthly utility bills over the lifetime of the unit, but it could take years before the initial cost is recouped. If you’d rather pay more now to save more later, than a high SEER unit is a wise choice.


Common questions/FAQs about SEER

  1. Are higher SEER units better made?
    Base models, such as 13 SEER and 14 SEER systems, are made with the same quality equipment as higher SEER units. When you pay extra for a high SEER system, you’re paying for increased efficiency only, not better quality.
  2. Will the minimum-required SEER rating continue to increase?
    As technology improves and manufacturers continue making higher SEER models, it’s likely that every several years or so, the minimum SEER rating will increase. In fact, there is a proposal to increase the current 13 and 14 SEER minimum to 14 and 15 by 2023. Increasing the energy efficiency of all appliances is a move in the right direction for the environment and for consumers.
  3. How can I find out the minimum SEER rating for my state?
    Click here for this informative brochure by the U.S. Department of Energy.
  4. Are there rebate incentives for higher SEER units?
    Yes, higher SEER units typically come with incentives and/or rebates offered by federal, state, and local governments. Many utility companies offer rebates as well.
  5. Do I have to upgrade my unit to the minimum SEER now?
    No, if your older model is still working fine, then you do not need to replace it. However, it’s important to note that your old unit is likely going to cost you more to operate than a newer, more energy-efficient model would.
  6. What is a good SEER rating?
    14 and 16 SEER are good ratings for most people. Of course, everybody is different and certain factors such as personal lifestyle choices, concern for the environment, budget, and local climate should be considered. You can find 14 and 16 SEER systems that are well-made, energy efficient units that are both good for the environment and good for your wallet.

Simplifying SEER and Understanding Your HVAC Unit

Family Hugging


The Definition of SEER

What is SEER? The short and simple explanation of SEER is that it’s a number assigned to an AC unit indicating its energy efficiency. The higher the SEER number, the more energy efficient the system is, which is important because an energy-efficient unit will not only reduce your monthly utility bills, but will also reduce your carbon footprint, thereby benefitting the environment. Naturally, then, it would make sense to purchase an AC unit with the highest SEER rating available, right? Well, not necessarily. As we explain a little more about the SEER rating, you’ll understand why a high-rated SEER unit may not be the right one for you.


S-E-E-R – Breaking it down

SEER stands for “Seasonal Energy Efficiency Ratio.” The key word to remember in this acronym is “Seasonal,” as the SEER number is determined by measuring an AC unit’s efficiency as it operates over a period of time with varying degrees of temperature and humidity levels, which mimic a typical summer season for most areas in the U.S. This is typically referred to as the “cooling season.”

SEER ratings are calculated by measuring the amount of cooling provided (energy output, measured in BTU’s), during a cooling season and dividing it by the amount of energy consumed (energy input, measured in watts), over this same period of time. An AC unit that uses less energy to produce the same amount of cooling than another unit over the cooling season, operates more efficiently and will have a higher SEER number. Of course, the higher the SEER number, the more expensive the unit, but oftentimes the savings recouped from a more energy-efficient unit make up for the higher upfront cost. For example, if you replace a SEER 10 unit with a SEER 13 unit, then the same amount of cooling will be produced while using 30% less energy! That’s a 30% reduction in harmful emissions and a 30% reduction in your utility bill.  If you have a unit with a SEER rating that’s less than 10, and you upgrade to a SEER 13, or higher, then the energy and cost savings will be even greater.

When shopping for a new AC unit, the SEER rating is an important piece of information that allows you to compare the energy efficiency of air conditioners and help determine an AC unit’s approximate annual operating costs.


SEER vs. EER

Oftentimes alongside the SEER rating, you will see an EER rating. EER stands for “Energy Efficiency Ratio” and is a number that measures an AC unit’s energy efficiency at a specific temperature, instead of over a period of time with different temperatures (hence, no “S” for seasonal). EER was created in 1975 by the Air Conditioning, Heating & Refrigeration Institute (AHRI) as a way of measuring the cooling efficiency of HVAC units. To determine the EER rating, the amount of cooling provided (energy output) is divided by the amount of energy consumed (energy input) while operating under a singular set of weather conditions, which is typically an outdoor temperature of 95°F, an indoor temperature of 80°F, and a humidity level around 50%.

Realizing that the EER rating doesn’t take into account certain variables, such as seasonal weather fluctuations and the resulting heat loss or gain that occurs when a system frequently cycles on and off, the SEER rating was developed in 1978 to more accurately gauge a unit’s efficiency during a typical summer season. The SEER rating, then, differs from an EER rating in that it is an average calculated over time; SEER is a measurement of an AC unit’s efficiency as it maintains a constant indoor temperature over the course of a cooling season with varying outdoor temperatures ranging from a low of 65°F to a high of 104°F with humidity levels ranging from 30% to 80%.

Just as with SEER ratings, a high EER rating indicates a more energy-efficient system and is a useful way to determine the efficiency of an AC unit when comparing across brands. However, the SEER number is a better indicator of an AC unit’s overall operational cost as it takes into account how well the unit works under a variety of weather conditions over the course of typical year. Just remember to always compare one unit’s EER to another’s EER, and SEER number to SEER number when looking at multiple units.


SEER by the Numbers (13/14 SEER, 16 SEER, 18 SEER, 21 SEER)

As previously mentioned, a SEER 10 unit replaced with a SEER 13 unit results in a 30% energy savings. What if you wanted to go even higher? Below is an example of the potential energy savings and cost savings of replacing a SEER 10 unit with a higher SEER-rated unit.

Based on a 3-ton AC with a SEER 10 rating that consumes around $1,323 in electricity per year:

  • A SEER 18 unit will produce 44% in energy savings per year and consume around $735 in electricity per year.
  • A SEER 21 unit will produce 52% in energy saving per year and consume around $630 in electricity per year.
  • A SEER 25 unit will produce 60% in energy savings per year and consume around $529 in electricity per year.

Increasing Your Savings With SEER


What does SEER have to do with MPG?

It’s important to note that an AC unit’s SEER rating represents the maximum efficiency of that particular unit. This means that an AC unit with a SEER 22 rating can reach an efficiency level as high as 22, but may not always operate at a 22. So, just like Miles Per Gallon (MPG), which is used to measure the gas efficiency of a car, the higher the MPG rating, the more miles per gallon you can get out of it; but only when it’s being driven under ideal travel conditions (good weather, safe speeds, level ground, etc.). If, on the other hand, you drive your 36 MPG rated car like one of the characters from the Fast and the Furious, then your car’s average MPG number will be much lower, perhaps in the 20s.

There are things you can do to help your AC unit run at its most efficient rating, such as maintaining a regular temperature in your home, keeping the air filters clean, and checking for leaks in the ductwork.


Benefits and Regulation

Created and regulated by the Department of Energy in 2008, the SEER rating helps consumers cut down on energy consumption and costs while providing better cooling for their home. Also, by raising the minimum SEER rating across the U.S., the depletion of natural resources will be reduced as will the emission of harmful gases into the environment. It is required by law that all central air conditioning units be evaluated, rated, and assigned a SEER number by the manufacturer in accordance with efficiency tests stipulated by the U.S. Department of Energy.


FTC and the US Department of Energy

In 2015, the DOE established new minimum efficiency ratings for three different portions of the U.S. – the North, the South, and the Southwest. For new central air conditioners manufactured and sold in the warmer, southern regions, the minimum SEER was raised to 14. For northern regions, the minimum remains a SEER 13. The standard SEER breakdown across the nation is as follows:

SEER 13 minimum: Alaska, Colorado, Connecticut, Idaho, Illinois, Indiana, Iowa, Kansas, Maine, Massachusetts, Michigan, Minnesota, Missouri, Montana, New Hampshire, New Jersey, New York, North Dakota, Ohio, Oregon, Pennsylvania, Rhode Island, South Dakota, Utah, Vermont, Washington, West Virginia, Wisconsin and Wyoming

SEER 14 minimum: Alabama, Arizona, Arkansas, California, Delaware, Florida, Georgia, Hawaii, Kentucky, Louisiana, Maryland, Mississippi, North Carolina, Nevada, New Mexico, Oklahoma, South Carolina, Tennessee, Texas, and Virginia.

It is not required that consumers immediately upgrade to a more efficient unit, rather the minimum rating only applies to new units being manufactured and sold in the U.S. after January 2015.

Also, the Federal Trade Commission’s EnergyGuide label (the yellow “hang tag” attached to heating and cooling systems), will now display a range of numbers representing the lowest and highest SEER rating for split-system air conditioners, instead of a single rating.


Types of AC

Now that you know about SEER and EER ratings and how they relate to an AC unit’s efficiency, understanding the different types of air conditioning systems available will help you decide which option is the best one for your home.

Window Units: Also known as “room air conditioners,” this type of system contains all the necessary AC components (compressor, condenser, evaporator, and cooling coil) into a single box that is placed either in a window or wall of a room. Blowing cool air directly into a room, this type of system is effective for cooling small spaces and homes. Window units only have an EER rating.

Central Air Conditioners: Distributing cooled air via a system of ducts, Central AC systems work best for larger homes and buildings.The two most common types of Central Air Conditioning systems are split or packaged units.

Split systems: A split system has an indoor component, which includes the evaporator coil and blower, and an outdoor component, which includes the condenser coils, condensing fan, and the compressor housed in a metal case. This type of system is economical because it shares the ductwork used by the heating system.

Packaged units: A packaged unit is usually located outdoors and combines the evaporator coil, condenser, and compressor into a single cabinet. Air is drawn from the inside through ducts in the wall or roof and returned, cooled, to the inside of the house. Packaged units also typically include heating coils eliminating the need for a separate indoor furnace.

Ductless Mini-Split Systems: Ideal for houses with no ductwork, the mini-split system uses tubing to combine the outside compressor and condenser to indoor air-handling units, which are typically mounted high on a room’s interior wall and circulates the cooled air with a fan. Each room, however, will have its own air handler, much like a window unit, with the ability to cool a room to a temperature different from other surrounding rooms.

When determining the type of air conditioning system for your home, it’s important you choose a system that’s best fits the size of your home. A system that is too large or too small will not adequately cool or dehumidify your home.


Getting Another Bid

Now that you have a better understanding of how the SEER rating can affect your energy savings and reduce your monthly utility bill, it’s important to shop around to find the lowest-priced air conditioning system with your ideal SEER number. Don’t accept the first bid you come across – get another one, and another one still from a variety of AC retailers, including online retailers. You will be shocked at just how much money you can save by cutting out the “middle man” and ordering your new AC unit online. Check out these lowest-guaranteed prices here!

How to Estimate a Furnace Size

Regardless of whether you are a property owner or a contractor, finding a furnace of the right size to fit a specific space can be quite a challenge, especially if the sizes of the rooms are odd. Furnaces are quite reliable and long-lasting but even the best furnaces will require replacement at some time or the other.

While a good furnace specialist will give you all the information you need and provide a suitable option, it’s a good idea to have some basic understanding about what kind of furnace would work best for your application.  The information here will help you estimate the furnace size and this will help you pick an installation that works best for you. Even before we start estimating the size of the furnace, there are certain aspects, which have to be taken into account as they have bearing on the type of furnace you eventually pick.

1. Power of the Furnace

The furnace you choose has to be powerful enough to effectively heat the space it’s meant to be installed for. And it goes without saying that when you have a smaller home, you will need a much smaller furnace and vice versa. As a matter of fact, if you opt for a furnace of the incorrect size, you will eventually end up paying more in the long run. You require just the appropriate amount of power so that the heating levels and distribution are right. Care has to be taken to ensure that it doesn’t have excessive power as that will only make it cycle on & off all day, which will waste energy and money.

2. AFUE Rating

The Annual Fuel Utilization Efficiency (AFUE) rating is a crucial aspect of furnace size estimation. This rating refers to the gas heating equipment’s efficiency; this is the amount of heating that is delivered by the equipment, for every dollar that’s spent on fuel; typically the higher the rating, greater the efficiency. With the modern energy-efficient models that are now available in the market, you are able to get far more value for money as well. The information related to this rating should be mentioned in the paperwork or on the furnace itself; it is something you should check out and use in the calculations.

3. Exposure to the Sun’s Rays

If you have a large number of windows that are exposed to the sunlight for a major portion of the day, the indoor spaces will be naturally warmer. This means the furnace installation won’t have to work that hard to maintain a higher temperature. This is when the sunlight works for you. Insulation is the other factor that comes into play at this point. If there is a lot of good-quality insulation in your home, the indoor spaces will be able to better retain the heat your furnace generates.

BTUs/ Square Footage

The square footage is one of the main aspects of estimating the furnace size. If your furnace is oversized, it will unnecessarily use excessive power while one that’s smaller than it should be, will work overtime; and you will end up spending more money on your energy bills.  BTUs are the other major consideration; British Thermal Units measures the total amount of heat your furnace produces, which is usually in the range of 30-35 output BTUs/square foot. You would have to first multiply the furnace’s input BTU by the efficiency; the next thing to do is to compare the output BTU of the furnace to the actual amount of BTU required in that space.

Estimating the Size of a Gas Furnace

Since there are a number of variables to sizing a furnace, each unit is available in a variety of BTU outputs to meet the requirements of different spaces. This is why it is important to use all the criteria mentioned above, and experience to ensure that all this information is put into a package that works. While there is software which helps make the job easier, the professional that installs the furnace has to make the final determination.

Some Additional Considerations:

As mentioned earlier, the size of the space is the most important factor in estimating the furnace size. Aside from this and the points we just discussed, the other considerations that have to be kept in view and questions that would have to be asked are:

•    Is the home open and does it have a number of large windows and doors?

•    What are the size of the rooms?

•    Are there many smaller rooms, or fewer larger ones?

•    The orientation of the structure as a home with living areas facing southward will end up getting more heat from the winter sun.

Regional Climate and House Construction

•    The climate in the area your home is located in would also have to be used while estimating the size of the furnace. For instance a home located in Northern California would have to face much milder winters and the amount of heating power it requires will be less compared to a home in the Midwest.

•    The construction of the house is another factor that matters. For instance, if a home is made of brick, it is more naturally-insulated than a structure that has timber siding.

•    To a certain extent, the type of landscaping you have also has an impact on the amount of heat required to keep your home warm. If you have large trees surrounding your home, these provide protection from the winter winds and your home will require less heat to maintain more comfortable indoor temperatures.

Efficiency of the Furnace

Over the last few decades, there has been quite a lot of advancement in furnace technology. A high-grade furnace that has 93% rating and generates 100,000 BTUs, will produce far more heat compared to a less –expensive furnace with a rating of 80%, but of the same size. When you opt for a furnace that has a higher efficiency, you can get the same amount of heat from a smaller unit.

Estimating With the Use of Software

Since excessively large furnaces waste energy, resources and money, most municipalities now require that the contractors use relevant software to estimate the best furnace size for your new home. There are a variety of software packages, but most work very similarly. The square footage of the space that has to be cooled will be input into the system, which will compute the answer. If homeowners were happy with the service their older furnace provided, the replacement unit is then sized to match it.

Drawing a Working Estimate

A rough/working estimate will also be drawn based on the square footage and your climate, the efficiency and the size of the furnace. The standard that HVAC and Heating equipment companies use:

•    They calculate a minimum of 25-30 BTUs of heat per sq. in a home located in a moderate- warm climate.

•    A home that’s around 2,000 square feet in size would require about 50,000 to 60,000 BTUs to ensure it’s heated properly.

•    If you have a less-efficient furnace that operates only at 80% efficiency, a furnace of about 60,000- to 72,000-Btu would be required.

•    If a high-efficiency furnace is being installed, your home would require a furnace of 52,500- to 63,000-Btu furnace.

Estimating the Size of an Electric Furnace

Many homeowners, who are considering replacing their old furnaces, prefer electric units. While there are a number of benefits to opting for an electric furnace, these too have to be sized correctly.  While sizing a unit is a very important point, this is never a standalone aspect; it always works in tandem with aspects such as insulation, power and efficiency.

Electric Furnace Size

It is crucial that you have a furnace that functions well with reference to the size of the house. If you opt for a very small furnace, it would have to strain a lot to heat your home and you will find that you are saddled with high utility bills. Contrastingly, if you buy an oversized furnace, it will continue cycling at shorter intervals, which will have an impact on its energy-efficiency.

Just as in the case of a gas furnace, the size of an electric furnace is measured in BTUs. In order to get a fair estimate, you would have to determine the square footage for the area that’s to be heated, or the total square footage of the home. If you don’t have access to this information, your County Assessor would be able to provide you the accurate total. The steps in this table will help you determine what the accurate BTU requirement is. These are the BTUs required per sq. for the different geographic regions in the US:

•    South, Southeast and Southwest – 20-35 BTUs per sq. ft.

•    East, West, and Midwest – 30-40 BTUs per sq. ft.

•    North, Northeast, Northwest & the Higher Mountain Regions- 40 to 50 BTUs per sq. ft.

In order to determine which the optimal number in each of these categories is, you would have to take into consideration factors such as the climate in comparison to the surrounding areas, and the level of insulation in the home. If your home has very good insulation or you live in a region with a warmer climate, you should preferably use the lower figures on the scale. On the other hand, if you live in a home with less insulation or in a region with cooler climate, its best to go with the higher figures in the specific scale.

Comparing the Efficiency of the Electric Furnace

The energy rating shows how much of the heating unit’s energy is released as warmth. It’s always better to choose one with a higher efficiency number. For instance, if the furnace has an 80% rating that much of energy is directed towards heating the home while the remaining 20 percent gets burned off. These types of ratings are very common for gas furnaces.

In comparison, electricity always gets converted into heat completely and this is why the units typically rank at 100%. It’s also why many people prefer electric units over gas units. When other ratings are being compared, ensure you are making the comparison against the same sources, AFUE and Steady State Efficiency being the two primary ones.

Other Important Checks

It is crucial that you verify whether the unit is compatible with the duct systems that already exist on your property. If there is any damage to the duct or if it has holes/leaks, the system output would not meet your expectations. Make it a point to inspect the ducts and ensure that they are in a working condition before you actually order the furnace.

As discussed at the outset, sizing is never a standalone aspect. It works in conjunction with factors such as insulation. If you upgrade your insulation, it may be possible to slightly reduce the amount of power required to heat your home and you may be able to get the desired results with a smaller size unit. This will also reduce your electricity bills.  It must be kept in view that adding more insulation may not always be an option in every home. However, certain steps can go a long way in reducing your energy bills. If you need in excess of 68,000 BTUs, you can either opt for 2 furnaces that have their individual ducting systems, or a gas heating installation. The thing to keep in mind is that a larger heating element consumes more power. Most electrical furnaces are available in increments of 7,000-10,000 BTU and when it comes to sizing, you only need to get close.

If you choose a furnace that’s more than ten percent below the heating requirement of your property, it’s better to opt for the next size. While it’s alright to either oversize or undersize by a small margin, don’t oversize by more than twenty percent as that can result in short cycling which reduces your comfort and results in energy wastage.

Tips For Furnace Duct Sizing

While it is very important to choose a furnace of the right size, you would also need to ensure that the heating ducts that transfer the heated air throughout your home are also sized correctly. That will provide your home with the appropriate heating requirements. If the ducts are too small, the heater would have to operate more frequently to ensure the correct temperature is maintained as the ducts aren’t able to carry the heat efficiently.

If the ducts are excessively large, that will lead to an increase in your utility bills. The one way to add to the effectiveness of your ductwork is to ensure that its size has been calculated correctly as well. These are the few things you would have to do to size the furnace ducts correctly:

1. Measure the Rooms

One of the most important figures to have when you are estimating the size of the ducting installation is the square footage of every room that’s to be heated. Ensure that the measurements are accurate.

2. Know How Much CFM is Required

The cubic feet per minute (CFM) is the other number you require and this depends in the size of the furnace to be installed. You would have to do detailed load calculations and before estimating the duct sizing and finding the right furnace size for your home. This is quite a specialized task and its best that professionals handle the job for you.

3. Combine the Heating Requirements Of Various Rooms

If more than one room has to be heated and not the entire home, you would only have to add all the requirements of additional rooms while calculating the size. Based on its size, every room will have a different CFM and you would have to accurately measure the complete area of every room.

If one room requires 200 CFM while another requires 100CFM, the total of the 2 rooms would be 300 CFM; the ducting’s diameter would be based on that CFM amount.

4. Installing the Right Duct Size Connections

Once the duct size calculations have been done with all the calculations in mind, you would need to increase the duct size proportionately. The right size would have to be run from the furnace, and the installation would have to be handled expertly. If the ducting is installed incorrectly, that will impact the furnace’s heating capacityas much as improper sizing would.

If you want your furnace to perform optimally, you would have to ensure that the joints are fitted optimally and that the insulation is up to the mark. All your efforts of sizing your furnace correctly will be futile if you don’t size the ducting and its connections correctly; and ensure that the insulation is up standard.

As you can see, it can be very difficult for a layperson to understand all the nitty-gritty of estimating a furnace size for your home. This is why it’s best to hire the services of expert professionals from a reputed company for the job.

Pricefixer Van
Discover a better way to buy HVAC today.
Build Your System